Providing Best Services in Huntsville & Madison, AL
.webp)
.webp)
Follow us on Social.


.webp)
.webp)
.webp)

Dec 12, 2025
.webp)
2 Min
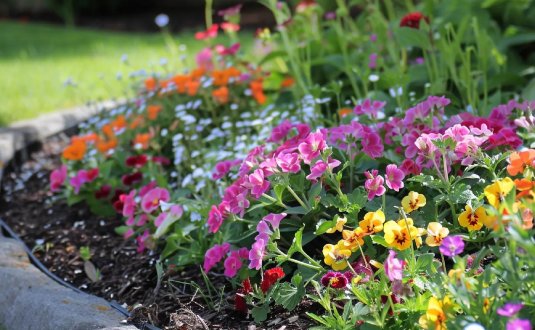
Does A Flower Bed Need Edging?
No, flower beds do not require edging to grow plants, but edging prevents grass invasion, reduces maintenance time, and creates visual definition between lawn and garden spaces. Grass roots spread through underground rhizomes and above-ground stolons. Without barriers, grass steals nutrients and water from flowers.
Edging blocks this invasion at depths of 4 to 6 inches below soil level. Most homeowners who skip edging spend 40% more time on garden maintenance compared to properly edged landscapes.
The decision to add edging depends on several factors. Grass type affects invasion speed. Bermuda grass and St. Augustine spread aggressively and colonize unprotected beds within one growing season. Cool-season grasses like fescue grow slower but still creep into garden spaces over time. Garden location matters too. Beds surrounded by paths or hardscaping need less aggressive edging than beds directly adjacent to active lawns.
What Are The Main Benefits Of Flower Bed Edging?
Flower bed edging blocks grass roots, contains mulch, reduces weeding time, and creates clear boundaries between different landscape zones.
Grass Root Prevention
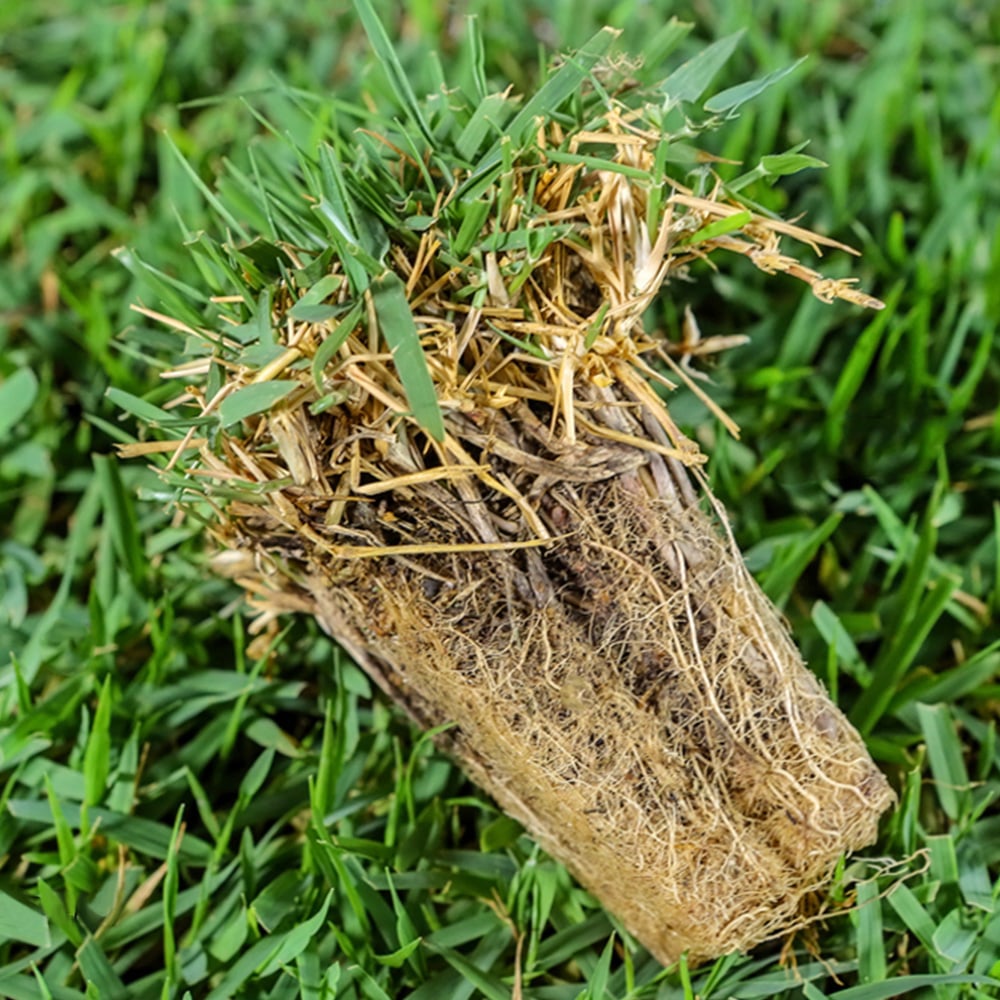
Grass species send roots deep underground seeking water and nutrients. Kentucky bluegrass roots reach 6 to 12 inches deep. Bermuda grass pushes down 6 to 24 inches. St. Augustine grass extends 4 to 8 inches below the surface. Zoysia grass roots grow 6 to 12 inches deep. Edging materials installed at proper depths intercept these root systems before they enter flower beds.
Different grass types exhibit varying aggressiveness. Warm-season grasses spread faster during summer months when temperatures exceed 65 degrees Fahrenheit. Cool-season varieties grow most actively during spring and fall when temperatures range 60 to 75 degrees. Understanding local grass behavior helps homeowners choose appropriate edging depths and materials.
Mulch And Soil Containment
Rain and irrigation wash mulch onto lawns without barriers. A 2-inch barrier above ground keeps wood chips, bark, and stone mulch inside garden beds. This saves $50 to $150 per year in replacement mulch costs for average-sized beds. Mulch loss exposes soil to sun, which encourages weed seed germination and increases water evaporation.
Soil erosion becomes problematic on sloped properties without edging. Heavy rainfall carries nutrient-rich topsoil downhill and onto hardscaping or into storm drains. Yard erosion damages plant health and creates unsightly runoff patterns.
Maintenance Time Reduction
Edged beds cut trimming time by 40% compared to unedged spaces. Mowers roll along defined edges without catching flower stems. String trimmers touch up borders in minutes instead of hours. Clear boundaries let landscape crews work efficiently without guessing where lawn ends and garden begins.
Professional maintenance contracts often cost less for properly edged properties. Crews complete work faster and encounter fewer complications. The time savings translates to lower labor charges.
Property Value Enhancement
Property value increases with professional edging installation. Real estate studies show well-defined landscapes sell faster and command higher prices. Homes with clean edging spend 15% less time on market compared to similar homes with undefined beds. Landscape professionals report that edging increases home values by 5% to 10% through improved curb appeal alone.
First impressions matter tremendously in real estate. Potential buyers form opinions within seconds of viewing properties. Clean landscape edges suggest meticulous maintenance throughout homes.
What Types Of Edging Materials Work Best?
Metal, plastic, brick, stone, wood, and concrete serve as common edging materials, each offering different durability levels, costs, and installation requirements.
Metal Edging Options
Metal edging comes in two main types. Steel strips cost $2 to $6 per linear foot. Aluminum runs $3 to $5 per foot. Both materials bend to follow curves and last 20 to 50 years with minimal maintenance. Steel develops rust patina that many homeowners prefer for natural appearance. Aluminum resists all corrosion in any climate zone.
Installation requires a rubber mallet for soft soil or shallow trenching for hard ground. Most metal edging stands 4 to 6 inches tall with half the height buried underground. The thin profile creates subtle visual separation that some designers prefer over bulkier options.
Plastic Edging Varieties
Plastic edging varies widely in quality and price. Standard plastic costs $0.50 to $3.50 per linear foot. Budget options degrade in 3 to 5 years under UV exposure. High-density polyethylene HDPE plastic lasts 100+ years underground according to manufacturer testing. Flexible plastic follows tight curves better than rigid materials.
Black plastic disappears visually against mulch and soil, creating subtle definition. Stakes anchor plastic every 3 feet to prevent movement. This option works well for DIY installation because it weighs little and cuts easily with hand tools.
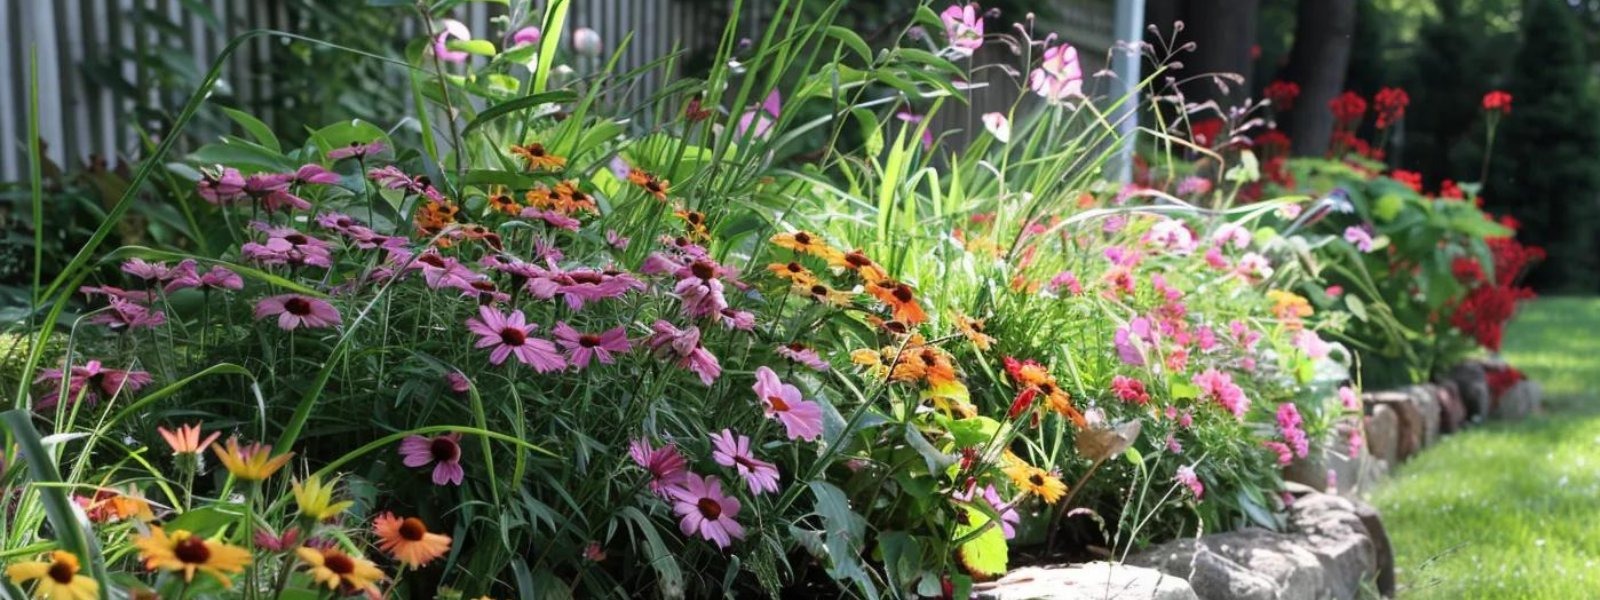
Brick And Stone Borders
Brick borders cost $2 to $5.50 per foot for materials and installation. Natural stone ranges from $2.50 to $10 per foot based on type and regional availability. Brick creates formal, traditional lines that suit colonial and craftsman architecture. Stone offers rustic appearance matching cottage and farmhouse styles.
Stack multiple layers for raised bed walls 8 to 16 inches high. Install single rows flush with ground level for mower-friendly edges. Mortar between joints prevents grass penetration through gaps. Unmortared installations look more casual but allow grass infiltration over time.
Wood Material Choices
Treated lumber runs $4 to $9 per linear foot. Cedar and redwood resist rot better than pine or fir. Wood edging typically lasts 5 to 10 years before replacement becomes necessary. Climate affects longevity significantly. Dry western regions see longer wood life while humid southern and eastern zones experience faster decay.
Boards stack easily for raised beds. Wood complements cottage gardens and informal landscapes where slightly weathered appearance enhances overall aesthetic.
Concrete Installation
Poured concrete costs $4.50 to $9 per foot including professional installation. Precast blocks run $2 to $5 per foot. Concrete edging lasts 10 to 30 years depending on climate and installation quality. Custom poured borders follow any shape including tight curves and complex angles.
Stamping creates patterns resembling brick, stone, or tile. Staining matches home exteriors or complements landscape color schemes. Concrete creates permanent barriers that grass absolutely cannot penetrate when installed properly.
Natural Trench Methods
Natural trench methods cost nothing except labor time and tool use. English borders feature vertical cuts on lawn sides and 45-degree slopes on bed sides. The removed soil gets spread into beds, raising planting areas slightly above lawn level.
Spring and fall touch-ups take 30 to 60 minutes per 100 linear feet. This method suits gardeners who prefer ongoing control over upfront material costs. The clean lines rival permanent materials when freshly cut but soften between maintenance sessions.
How Much Does Flower Bed Edging Cost?
Professional edging installation costs $3.50 to $8.80 per linear foot on average, with total project costs ranging from $630 to $1,584 for 180 feet of borders.
Material Cost Breakdown
Material costs represent roughly half of total project expenses. Plastic runs $0.50 to $3.50 per foot for materials only. Brick ranges $2 to $5.50 per foot. Stone varies $2.50 to $10 per foot depending on type and source. Wood costs $4 to $9 per foot. Metal edging runs $2 to $6 per foot. Concrete materials cost $2 to $9 per foot.
Bulk purchasing reduces per-unit costs significantly. Buying materials for entire properties at once saves compared to piecemeal purchasing. Some suppliers offer contractor discounts to homeowners on large orders.
Labor And Installation Expenses
Labor adds $3 to $7 per square foot for professional installation. Experienced crews complete straightforward projects in one day. Complex curves, rocky soil, and slope work increase costs by 20% to 40% over baseline estimates. Professional landscaping services often bundle edging with other landscape work reducing overall costs through efficiency gains.
Regional price variations affect total costs significantly. Urban areas with higher living costs see premium pricing. Rural regions often charge less for comparable work. Competition among local contractors influences pricing too.
DIY Cost Considerations
DIY installation cuts costs by 50% to 70% compared to professional work. Homeowners need basic tools including spades, rubber mallets, levels, string lines, and measuring tapes. Weekend warriors typically complete 50 to 75 feet of edging per day working at moderate pace.
Rental equipment like power bed edgers speeds work significantly but adds $75 to $150 per day to project costs. Most residential projects complete in one rental day if homeowners prepare properly.
How Deep Should Edging Be Installed?
Edging must extend 4 to 6 inches below ground level to block grass roots, with 1 to 2 inches remaining above ground to contain mulch and prevent surface runners.
Understanding Grass Root Depths
Grass root depths vary by species and growing conditions. Kentucky bluegrass sends roots 6 to 12 inches deep in established lawns. Bermuda grass pushes 6 to 24 inches underground seeking water during drought. St. Augustine grass typically reaches 4 to 8 inches below surface. Zoysia grass extends 6 to 12 inches down.
Irrigation schedules influence root depth dramatically. Frequent shallow watering encourages shallow roots. Infrequent deep watering promotes deep rooting.
Minimum Depth Requirements
Shallow edging at 1 to 2 inches depth stops some species but fails against aggressive spreaders. Bermuda grass rhizomes easily tunnel beneath inadequate barriers. Standard 6-inch depth blocks most common grass types in residential landscapes. This measurement means 4 to 5 inches underground plus 1 to 2 inches above surface.
Sandy or loose soils may require 8-inch total installation depth because grass roots penetrate farther in these conditions. Professional installers sometimes go deeper around aggressive grass varieties. Bermuda grass control may need 8 to 10 inches of barrier depth in southern climates.
Raised Bed Depth Adjustments
Raised bed installations change depth calculations. When beds sit 8 to 12 inches above surrounding lawn level, shorter edging works adequately. The elevation itself provides barrier function. Grass struggles to climb vertical faces this tall.
Some raised bed designs incorporate edging into structural frameworks. Timber frames serve dual purposes as both soil containment and grass barriers.
What Installation Steps Create Effective Edging?
Mark boundaries with spray paint or hoses, cut vertical edges 4 to 6 inches deep, install chosen materials, backfill with soil, and add 2 to 3 inches of mulch.
Planning And Layout
Use marking paint to outline bed shapes. Garden hoses show curved lines accurately and adjust easily. Walk around marked areas multiple times checking sight lines from house windows, driveways, and street views. Good design considers how beds look from all viewing angles.
Leave 6 to 12 inches between mature plant stems and edging for growth space. Research adult plant sizes rather than using current dimensions. Perennials often triple in width over 3 to 5 years.
Edge Cutting Techniques
Spades and half-moon edgers cut sharp lines when pushed straight down. Tool sharpness matters significantly. Dull blades crush rather than slice through soil and roots. Push tools vertically on lawn sides of cuts. Angle tools 45 degrees on bed sides.
This creates trenches with one vertical wall and one sloped wall. The vertical lawn edge stays crisp during mowing. Remove all grass and roots from cut trenches. Leaving organic matter causes settlement as materials decompose.
Material Installation Process
Metal and plastic edging push into trenches using rubber mallets. Strike tops gently but firmly to drive materials downward. Check frequently that tops stay level and straight. Brick and stone need foundation layers for stability. Spread 2 inches of paver base in trench bottoms. Compact thoroughly using hand tampers or plate compactors. Add 1 inch of stone dust over paver base.
Set brick and stone pieces individually, checking levels constantly. Tap materials with rubber mallets to seat firmly into stone dust. Leave consistent joint widths between pieces.
Backfilling And Mulching
Backfill around installed materials using excavated soil. Add soil gradually, tamping every 2 to 3 inches of depth. Thorough compaction prevents future settling and shifting. Leave soil surfaces 1/2 inch below edging tops.
Spread wood chips, shredded bark, or stone 2 to 3 inches deep throughout beds. Mulch blocks weed seeds from germinating by preventing light penetration. Dark mulch colors like black or dark brown enhance contrast between lawns and beds.
How Often Does Edging Need Maintenance?
Natural trench edges require touch-ups 1 to 2 times yearly, while permanent materials need annual inspections for damage and grass intrusion checks every 2 to 3 weeks during growing seasons.
Seasonal Maintenance Schedule
Spring maintenance addresses winter damage and prepares edges for active growing season. Re-cut natural trenches after frost heave pushes soil around. Inspect permanent materials for cracks, shifts, or heaving. Reset materials that moved during winter.
Growing season care maintains edge appearance and grass control. Weekly mowing sessions should include edge inspection. Look for grass shoots emerging inside beds along edging lines. Pull these immediately while roots remain small and shallow.
Mulch replenishment becomes necessary as organic materials decompose. Wood and bark mulches break down over 8 to 10 months. Plan to refresh mulch annually in spring or fall. Adding 1 to 2 inches of new mulch maintains proper depth.
Fall tasks prepare edges for dormancy and winter weather. Final edge sharpening before grass stops growing maintains neat appearance through winter. Remove leaf debris to prevent matting and decay.
Material-Specific Maintenance
Brick and stone installations may need mortar repairs every 5 to 7 years. Freeze-thaw cycles crack mortar joints in northern climates. Re-pointing involves removing old mortar and applying fresh material.
Wood edging requires replacement every 5 to 10 years depending on wood type and climate. Watch for soft spots indicating rot. Termite damage shows as tunnels and sawdust accumulation. Replace compromised sections promptly.
Which Grass Types Require Deeper Edging?
Bermuda grass, St. Augustine, and Zoysia spread aggressively through rhizomes and require 6 to 8 inch deep edging, while cool-season grasses like fescue need only 4 inches.
Warm-season grasses dominate southern landscapes and exhibit vigorous spreading habits. These species grow actively from May through September when soil temperatures exceed 65 degrees Fahrenheit. Bermuda grass stands out as the most aggressive spreader. Rhizomes tunnel horizontally 12 to 24 inches underground seeking new territory.
St. Augustine grass grows thick and lush in coastal regions from North Carolina to Texas. This species sends substantial rhizomes 4 to 8 inches deep. Zoysia grass creates dense, carpet-like lawns prized for low maintenance needs.
Cool-season grasses demonstrate less aggressive spreading compared to warm-season cousins. Kentucky bluegrass, tall fescue, fine fescue, and perennial ryegrass grow actively during spring and fall when temperatures range 60 to 75 degrees Fahrenheit. These species rely more on tillering than rhizome spread. Standard 4-inch edging depth stops cool-season grass effectively.
Can Edging Stop All Weeds?
No, edging primarily blocks grass invasion but does not prevent airborne weed seeds from landing in beds or existing weed seeds in soil from sprouting.
Weed prevention requires multiple tactics working together. Pre-emergent herbicides stop seeds from germinating by creating chemical barriers in soil. Proper soil amendment and timing makes pre-emergent applications more effective. Edging contributes by creating defined treatment zones.
Landscape fabric blocks light to seeds already present in soil. This physical barrier prevents photosynthesis needed for germination. Thick mulch layers smother emerging weeds that penetrate other defenses. Organic mulches like wood chips and shredded bark need 3 to 4 inches depth for effective weed suppression.
Regular hand-pulling removes survivors that defeat other methods. Pulling weeds while small and young takes minimal effort. Daily or weekly bed inspections catch weeds early when removal takes seconds per plant. Edging makes inspection easier by creating clear boundaries.
Selective herbicides kill specific weed types without harming desired plants. Products targeting grassy weeds leave broadleaf flowers unharmed. Professional weed control services understand herbicide selection and application timing for maximum effectiveness.
What Problems Happen Without Edging?
Unedged flower beds suffer from grass invasion, mulch loss, unclear boundaries, increased maintenance time, and unprofessional appearance that reduces property values.
Grass colonizes unprotected beds relentlessly. Most species establish inside beds within one growing season. Removal requires digging or herbicide application that risks damaging flowers. Once grass establishes in beds, roots intertwine with flower roots making separation nearly impossible. The grass steals water and nutrients intended for flowers.
Mulch washes onto lawns during rain without containment. This creates mowing problems as wood chips dull mower blades and jam cutting decks. Cleanup involves raking mulch off lawns before mowing. This tedious work adds 15 to 30 minutes per mowing session. Average beds lose 25% to 40% of mulch annually without edging containment.
Undefined borders make trimming extremely difficult. String trimmers easily damage flower stems when operators guess where beds begin. Standing water problems worsen when mulch washes away and exposes compacted soil.
Property appearance suffers dramatically without clean edges. Potential home buyers notice sloppy landscaping immediately during property showings. The undefined, unkempt look suggests neglect throughout the property. Clean edging signals pride of ownership and proper maintenance habits.
When Can Flower Beds Skip Edging?
Raised beds elevated 8 inches or higher, temporary annual plantings, and naturalized wildflower meadows function well without formal edging barriers.
Raised bed walls contain soil and mulch naturally through vertical faces. Height prevents grass from climbing inside under normal conditions. Lumber frames cost $3 to $8 per linear foot including materials and basic assembly. Stone walls run $15 to $30 per foot. Raised beds work particularly well on properties with drainage issues because elevation improves water movement.
Annual flower beds that change layouts yearly avoid permanent edging investments. Gardeners who enjoy redesigning displays each season prefer flexible, adjustable borders. Budget options costing $0.50 to $1 per foot serve single-season purposes adequately.
Natural meadow gardens intentionally blur grass and flower boundaries. These landscapes mimic wild prairies where plant communities mix freely. Property owners pursuing ecological landscaping or wildlife habitat goals often eliminate traditional edging throughout their yards.
Island beds surrounded by hardscaping need minimal or no edging. Pavers, concrete walks, or gravel paths provide natural barriers that grass cannot cross. The hardscape itself defines bed boundaries clearly.
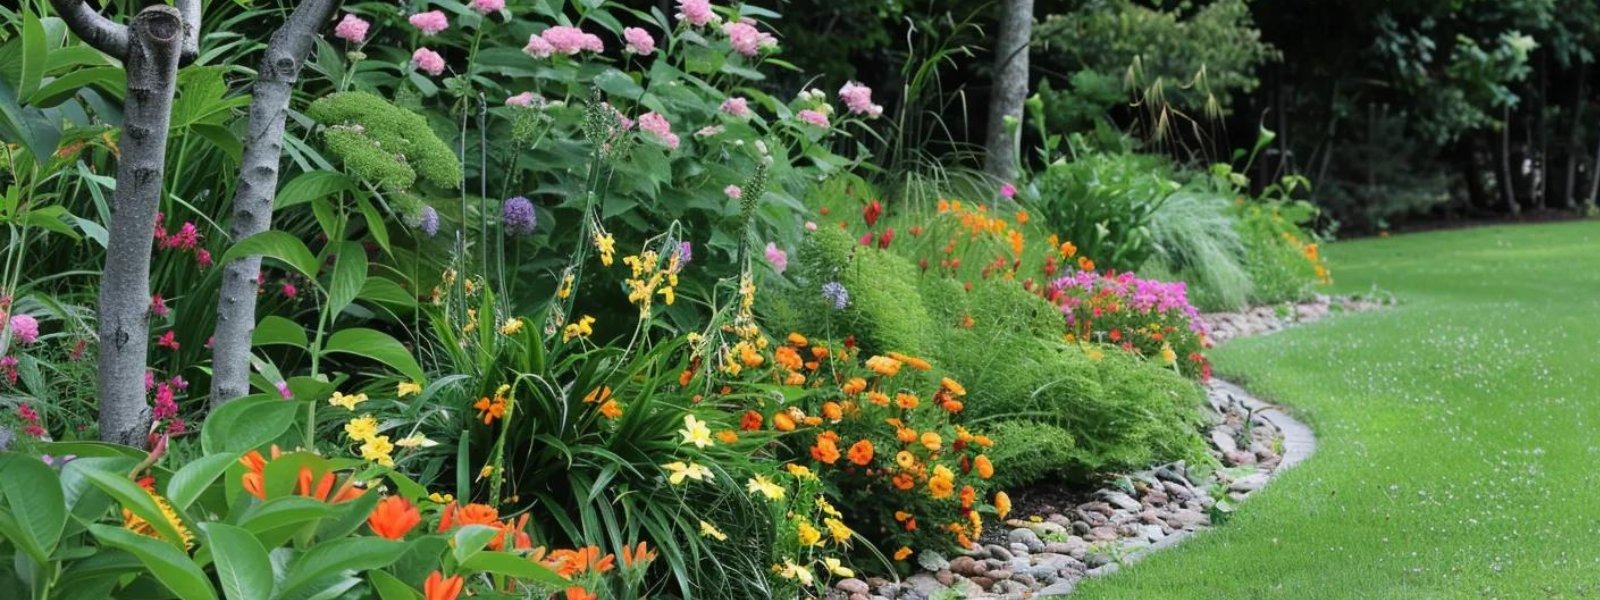
How Does Edging Connect To Overall Landscape Design?
Edging creates visual flow between hardscaping elements, defines outdoor room boundaries, guides foot traffic, and unifies landscape zones through consistent materials and colors.
Material coordination strengthens design cohesion throughout properties. Matching edging to home exteriors creates intentional connections between architecture and landscape. Brick homes pair naturally with brick borders. Stone foundations complement stone edging beautifully.
Repeating edging types throughout yards creates visual rhythm. Using identical materials around all beds, trees, and walkways ties separate spaces together. The repetition builds recognition as eyes move across landscapes. Professional landscape design considers edging during initial planning rather than as afterthought.
Edging guides circulation subtly by defining where people should and should not walk. Low edging discourages foot traffic without creating physical barriers. Taller edging provides stronger traffic control where necessary. Raised borders 6 to 12 inches high clearly communicate no-entry messages.
Contemporary landscape design treats yards as outdoor living spaces divided into functional zones. Dining areas, play spaces, meditation gardens, and utility zones each need clear but attractive separation. Edging creates these divisions without solid walls that block sight lines and air movement.
What Tools Make Edging Installation Easier?
Half-moon edgers, flat spades, rubber mallets, levels, string lines, and marking paint streamline edging installation for both DIY and professional projects.
Half-moon edgers feature sharp, curved blades perfect for cutting vertical lawn edges. The curved shape rocks smoothly through soil with each push. Quality models cost $40 to $80 but last decades with proper care. Flat spades remove sod and dig trenches accurately. Blade sharpness determines cutting efficiency dramatically.
Rubber mallets set materials without cracking or chipping. Metal hammers damage brick, stone, and even plastic edging. Choose mallets weighing 16 to 24 ounces for controlled strikes. Levels verify straight, even installation. Four-foot levels work well for most edging work.
String lines maintain straight edges over long distances. Mark endpoints with stakes. Stretch mason's line between stakes at desired edging height. Marking paint outlines bed shapes clearly before cutting begins. Use brighter colors like orange or pink for high visibility.
Power equipment speeds larger jobs significantly. Bed redefiner attachments mount to string trimmer powerheads. These specialized blades cut 4 to 6 inches deep in single passes. Plate compactors settle base materials and backfill soil better than hand tamping.
How Does Climate Affect Edging Choices?
Freeze-thaw cycles in northern climates shift rigid materials like brick and concrete, while southern heat degrades plastic and wood faster, requiring climate-appropriate material selection.
Northern regions face frost heave that pushes edging out of ground during winter. Temperature cycling through freezing and thawing expands and contracts soil. Metal and flexible plastic resist movement better than stacked stone or unmortared brick. Spring maintenance includes resetting displaced sections.
Southern sun exposure cracks low-quality plastic within 2 to 3 years. UV radiation breaks down plastic polymers, causing brittleness. UV-resistant HDPE or metal edging lasts much longer in hot climates. Wood deteriorates faster in southern humidity as well.
High rainfall areas demand materials resisting rot and erosion. Wood edging fails quickly in consistently wet conditions. Concrete and metal outperform all wood options in wet climates. Installation in high-rainfall zones must address drainage. Provide drainage gaps or weep holes every 10 to 15 feet along solid edging.
Coastal environments present salt exposure challenges. Metal edging near oceans corrodes faster from salt spray and air. Aluminum resists salt corrosion better than steel. Plastic ignores salt completely making it practical for coastal applications.
Desert conditions combine extreme heat with intense UV exposure. Wood edging in desert climates fails in 3 to 5 years typically. Concrete and stone perform excellently in deserts. Metal edging works well but may become hot enough to burn plants during peak summer.
What Mistakes Should Be Avoided During Installation?
Common edging errors include insufficient depth, inadequate staking, skipping base preparation, using incompatible materials, and ignoring drainage requirements.
Shallow installation represents the most frequent mistake. Edging buried only 2 inches deep fails against determined grass species. Many homeowners underestimate grass root depths. Always install edging at least 4 inches underground, deeper for aggressive grass types.
Loose materials shift over seasons creating gaps and low spots. Plastic edging needs stakes every 3 feet maximum. Brick and stone installations require thorough backfilling and compaction. Tamp soil firmly around all edging sides.
Installing brick or stone directly on native soil causes settling and joint separation. Always prepare stable foundations using 2 inches of compacted paver base and 1 inch of stone dust. Choose edging styles matching or complementing home architecture and existing landscape features.
Blocking water flow causes serious problems for plants and property. Solid edging without drainage provisions traps water in beds during heavy rain. Grade beds away from buildings ensuring water flows toward drainage areas not foundations. Leave drainage gaps every 10 to 15 feet in solid edging.
Frequently Asked Questions
How Long Does Edging Installation Take?
Professional crews install 100 to 150 linear feet of edging per day for standard materials and conditions. Simple straight runs with plastic or metal complete in 4 to 6 hours per 100 feet including trenching and cleanup. Brick and stone layouts require 6 to 8 hours per 100 feet. Poured concrete needs 2 to 3 days for forming, pouring, and curing.
Which Edging Material Lasts Longest?
COR-TEN steel, HDPE plastic, and poured concrete last longest with 30 to 100+ year lifespans while treated wood and brick offer 10 to 20 year durability. COR-TEN steel develops protective rust patina that prevents further corrosion. HDPE plastic resists UV damage with manufacturers rating it for 100+ years underground. Poured concrete lasts 30+ years when properly mixed and cured.
Can You Install Edging Yourself?
Yes, most edging types suit DIY installation with plastic and metal being easiest for beginners while brick and stone need more effort but remain doable with patience. Plastic edging weighs little and stakes into place quickly. Metal edging requires rubber mallets and some muscle. Brick and stone demand foundation preparation and careful leveling. Poured concrete usually needs professional help.
Does Edging Help With Drainage?
Edging contains mulch and soil while allowing water to flow through or around beds preventing washouts and directing runoff away from foundations. Solid barriers like poured concrete need drainage gaps every 10 to 15 feet. Permeable materials like stacked stone naturally drain between joints. Metal and plastic allow water to pass underneath when installed at proper depths.
How Much Does It Cost To Edge A Flower Bed?
Professional edging costs $3.50 to $8.80 per linear foot on average with DIY installation saving 50% to 70% on total expenses. Material costs range from free for natural trench methods to $9 per foot for premium concrete or stone. A typical project of 180 linear feet costs $630 to $1,584 professionally installed. DIY homeowners spend $200 to $600 for the same project.
Final Thoughts
Flower beds grow plants successfully without edging but perform far better with proper barriers. Grass invasion stops completely with edging installed at correct 4 to 6 inch depths. Maintenance time drops by 40% compared to unedged landscapes. Property values increase 5% to 10% from improved curb appeal.
Material costs range from free for trench methods to $9 per foot for premium options. Most homeowners spend $3.50 to $5 per foot for quality results balancing durability and budget. Professional hardscaping work includes edging as standard practice. DIY installation saves 50% to 70% on costs but requires proper tools and techniques.
Choose materials matching home style, local climate, and maintenance preferences. All edging types dramatically outperform no edging. The investment returns value through reduced work, better plant performance, and enhanced appearance. Properties near Huntsville and Madison, Alabama benefit from local expertise understanding regional soil conditions, grass varieties, and climate patterns. White Shovel provides complete landscape services from initial design through professional installation creating outdoor spaces that look beautiful while requiring minimal upkeep.
.webp)

.webp)


You May Also Like

Jul 24, 2026
3 MIN
How Much Sun Does Zoysia Grass Need

Jul 22, 2026
3 MIN
Can You Mix Zoysia and Bermuda Grass in One Lawn?
Jul 19, 2026
3 MIN
How Long Does Zoysia Grass Seed Take to Grow?
Jul 18, 2026
3 MIN
Is zoysia grass shade tolerant
Stay Connected and Inspired
Get the latest landscaping tips, seasonal care guides, and exclusive offers delivered straight to your inbox. Don’t miss out on expert advice and ideas to transform your outdoor spaces.
Sign Up for Our Newsletter Today!
.webp)


.webp)

Transforming Huntsville & Madison yards since 2010 with expert landscape design, garden makeovers, mulching, and top-quality installations.


