Providing Best Services in Huntsville & Madison, AL


Follow us on Social.





Sep 1, 2026

3 min

Landscaping
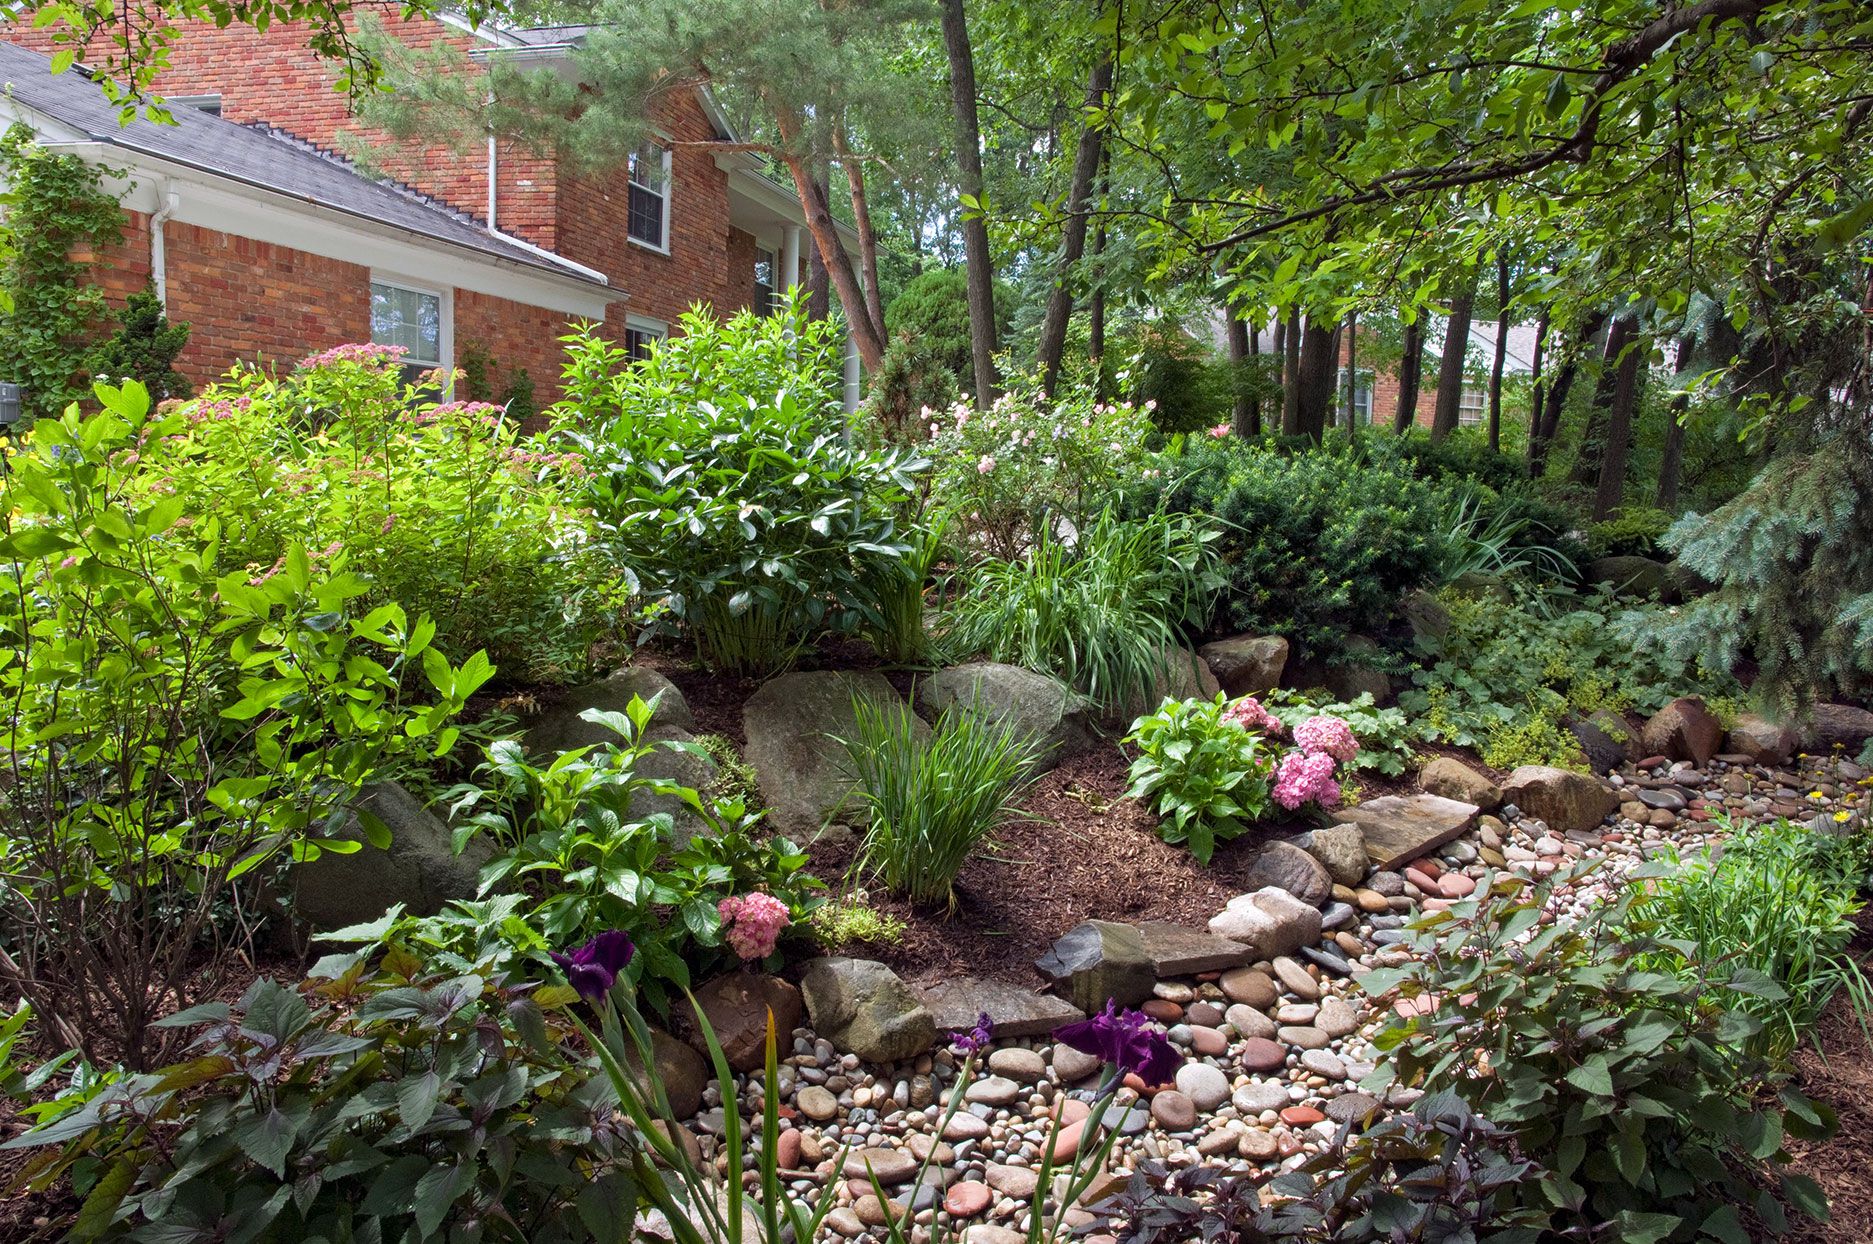
How to Build a Rain Garden in Clay Soil
To build a rain garden in clay soil, run a percolation test first, then pick your build based on the result. Soil that drains faster than 0.5 inches per hour supports a standard rain garden with amended soil. Soil slower than that needs a perforated underdrain beneath the basin to move water out within 48 hours.
Clay does not rule out a rain garden. It changes how you build one, and it changes the numbers. Below we walk through the percolation test, siting rules, how to size the basin without getting three different answers from three different sources, the soil mix that actually works in clay, the plants that thrive there, and what the garden does to your soil over the following three years.
Can You Build a Rain Garden in Clay Soil?
Yes, you can build a rain garden in clay soil, using either amended soil or a perforated underdrain depending on how fast your ground actually drains. Clay makes the job harder rather than impossible, and the difference between the two builds comes down to a number you can measure in an afternoon.
Clay is defined by particle size. Clay particles measure less than 0.002 millimeters across, which packs them tightly enough that water moves through slowly and air spaces stay minimal. Tight packing is why clay puddles after rain, cracks in drought, and turns sticky under a shovel.
None of that stops water from being managed. A rain garden is a shallow planted depression that captures runoff and holds it while it soaks in, and the holding part works in any soil. The soaking part is what clay complicates, and that is the problem the rest of this guide solves.
How Do You Test Soil Drainage for a Rain Garden?
You test soil drainage for a rain garden with a percolation test: dig a hole about 12 inches deep, fill it with water, let it drain completely, fill it again, then measure how many inches the water level drops per hour. The second fill is the one that counts, because the first fill saturates the surrounding soil and gives you an artificially fast reading.
Two benchmarks matter. Mississippi State University Extension advises that soil draining less than 1 inch per hour needs additional drainage measures. US EPA guidance for infiltration practices puts the working floor for native soil at roughly 0.25 to 0.5 inches per hour. Below half an inch per hour, a basin relying on native soil alone will hold water too long.
Aquabarrel's field guidance offers a simpler pass or fail version: a 12-inch hole that empties within 24 hours indicates soil suited to a rain garden. That test is easier to run and harder to misread than timing inch-by-inch drops, and it gets most homeowners to the right answer. How much water your ground can take in is the whole question, and soil absorption varies enough across a single yard that testing at the actual basin location matters.
Run the test when the ground is neither bone dry nor already saturated. Dry clay gives a falsely fast reading through surface cracks, and saturated clay gives a falsely slow one.
Do You Need an Underdrain in a Clay Rain Garden?
You need an underdrain in a clay rain garden when the measured infiltration rate falls below 0.5 inches per hour, because below that threshold the basin cannot empty within the 48-hour standard on its own. An underdrain is a 4 to 6 inch perforated pipe laid in a gravel bed at the bottom of the excavation, connected to a safe outlet downhill.
Adding an underdrain changes what the garden is doing. Instead of soaking all captured water into the ground, the basin filters it through the growing media and releases the excess through the pipe. Filtration and flow control still happen; groundwater recharge largely does not. That trade is worth making, since a basin that holds water for a week is a liability rather than a feature. The pipe and gravel construction is the same approach used in a French drain, applied underneath a planted basin instead of alongside a wet area.
Where the outlet goes deserves as much thought as the pipe itself. Discharging an underdrain into a spot that already collects water simply relocates the problem, which is why we design the outlet path before we dig anything. Sizing an underdrain and finding it a legal, effective outlet is the part of the job most homeowners hand off, and it is the core of what proper drainage solutions address.
Where Should You Put a Rain Garden?
You should put a rain garden downslope from your house, at least 10 feet from the foundation, within about 30 feet of the downspout feeding it, and away from septic fields, large trees, and slopes steeper than 12%. Every source that publishes siting guidance agrees on the 10-foot setback, and it is the rule with the most expensive consequences if broken.
Call 811 before any excavation. Mississippi State Extension puts utility location first on its siting checklist for good reason, since rain gardens require real digging and buried lines do not announce themselves.
Slope limits matter more in clay than in sand. Extension guidance advises avoiding areas over 12% slope, because water arrives faster than a basin can absorb it and the berm ends up doing structural work it was never built for. Large trees are the other exclusion: excavation within the root zone damages the tree, and the extra water sitting there can finish the job.
Fitting the basin into the yard as a designed feature rather than a utility pit is what separates a rain garden people enjoy from one they resent. That integration is the work of landscape design, and it decides whether the finished basin reads as a garden or a hole.
How Far From the House Should a Rain Garden Be?
A rain garden should sit at least 10 feet from the house foundation, and further is better on clay soil. The basin deliberately concentrates and holds water, and clay transmits that moisture laterally rather than downward. Concentrated moisture against a foundation is the mechanism behind most foundation issues in expansive soils, so the setback is not a formality.
Where Should You Not Put a Rain Garden?
You should not put a rain garden over a septic drainage field, within the root zone of a large tree, on a slope steeper than 12%, uphill of your house, or anywhere water already stands for days. That last exclusion surprises people. A spot that stays wet is telling you the ground there cannot absorb what it already receives, so adding more water to it makes the problem worse rather than better. Those areas need drainage correction first, and a rain garden second.
How Big Should a Rain Garden Be?
A rain garden should be sized at roughly 5 to 7% of the watershed draining into it, which works out to about 700 square feet for a typical one-third acre lot. Published guidance varies widely on this point, and a homeowner reading three guides gets three incompatible answers. The table below reconciles the three common methods.
Sizing MethodHow to CalculateResult on a One-Third Acre LotBest Used WhenWatershed percentageMeasure all roof, drive, walk, and lawn area draining to the spot, take 5 to 7%About 700 sq ft from 14,375 sq ft of watershedThe garden receives the whole property's runoffDrainage area percentageTake 10 to 20% of the contributing area onlyVaries with how much area actually drains thereClay soil, where a larger footprint offsets slow infiltrationFixed footprintBuild to a standard residential range100 to 300 sq ftA single downspout feeds the gardenPonding depthShallower on clay, deeper on sand4 to 6 inches on clay, up to 8 inches on loam or sandAlways, once footprint is set
Sources: Mississippi State University Extension rain garden guidance; Knox County Tennessee Stormwater Management Manual; Minnesota Stormwater Manual bioretention design criteria; US EPA green infrastructure guidance.
The three methods disagree because they answer different questions. Watershed percentage sizes a garden meant to handle everything a property sheds. Fixed footprint sizes a garden fed by one downspout. Clay pushes you toward the larger end of whichever method applies, since slower infiltration means the basin needs more surface area to move the same volume.
The math is straightforward once you pick a method. One acre equals 43,560 square feet, so a one-third acre lot yields roughly 14,375 square feet of watershed, and 5% of that is about 700 square feet of garden. That basin can be any shape: 20 feet by 35 feet and 10 feet by 70 feet both work.
How Deep Should a Rain Garden Be in Clay Soil?
A rain garden in clay soil should pond 4 to 6 inches deep, shallower than the 8 inches used in sandy soil. Ponding depth is the depth of standing water above the soil surface, not the depth of excavation. Shallower ponding on clay keeps drawdown within the 48-hour window despite slower infiltration, and Extension guidance notes the practical benefit that a 6-inch basin minimizes injury if someone steps into it. Professional bioretention standards cap recommended ponding at 6 inches for the same reasons.
How Do You Build a Simple Rain Garden?
You build a simple rain garden by marking the basin, excavating from the center outward, using the excavated soil to form a berm on the downhill side, amending or underdraining the base, setting an overflow, then planting and mulching. The sequence below is the one we follow on clay installations:
- Mark the basin and call 811. Stake the outline with string and request utility location before a shovel touches the ground. Excavation depth here is real, not decorative.
- Excavate from the center out. Dig the middle deepest and slope the sides gently upward to the rim. A flat bottom spreads water evenly instead of concentrating it in one corner.
- Build the berm with the spoil. Compact the excavated soil into a ridge 6 to 8 inches high around the downhill edge. Build it higher on the low side where the ground falls away fastest.
- Install the underdrain, if your perc test called for one. Lay 4 to 6 inch perforated pipe in a gravel bed at the base, sloped to a safe outlet. The right gravel here matters, since undersized material packs and blinds the pipe.
- Place the growing media in lifts. Backfill in 6-inch layers without heavy compaction. Compacting the media destroys the pore structure the whole basin depends on.
- Set the overflow. Cut a stabilized notch in the berm 6 to 12 inches above the media surface, armored with stone, so storms exceeding capacity leave in a controlled direction.
- Plant by moisture zone. Wettest species in the center, transitional species on the slopes, drought-tolerant species on the rim.
- Mulch and water in. Two to three inches of shredded hardwood suppresses weeds, prevents clay from crusting, and filters sediment before it reaches the soil.
Step 6 is the one most often skipped and the one that causes the most damage. Every rain garden eventually meets a storm larger than it was designed for, and a basin without a planned overflow route sends that water wherever gravity decides. Planning the escape path is standard practice in any yard drainage work, and it costs almost nothing at the build stage.
Does Wetting Clay Soil Make It Easier to Dig?
Yes, wetting clay soil makes it easier to dig, but digging wet clay damages the soil structure you are trying to improve. Wet clay smears and compacts under a shovel blade, sealing the excavation walls into a slick surface that water struggles to pass through. That smeared layer is sometimes called glazing, and it can undo the infiltration benefit of the entire basin.
Work clay when it is slightly moist rather than wet or bone dry. If you must soften hard ground, water lightly a day ahead rather than soaking it, and scarify the excavation walls and floor with a fork before backfilling to break any glazed surface.
What Is the Best Soil Mix for a Rain Garden in Clay?
The best soil mix for a rain garden in clay is a sandy loam or loamy sand blend with 10 to 25% clay content, 1.5 to 3% organic matter, and a field-tested infiltration rate between 1 and 8 inches per hour. Those are the specifications professional bioretention work is built to, and they are achievable in a residential basin.
Extension guidance for clay sites recommends excavating and replacing soil with a loose mix of roughly 50% sand, 25% topsoil, and 25% compost, to a depth of up to 3 feet. Engineered bioretention media runs sandier still, commonly 85 to 90% sand with 5 to 10% topsoil and 3 to 5% compost, and Missouri Botanical Garden's rainscaping guidance describes engineered systems as using a 60 to 80% sandy soil mix with a piped underdrain. The common thread across all three specifications is that sand dominates by volume and the mix is built rather than amended in place.
Depth follows what you plant. Bioretention standards call for a planting soil bed at least 2 feet deep, increasing to 4 feet where trees go in. Replacing that volume of clay is real excavation, which is where a homeowner project often becomes a contracted one, and where soil amendment work is priced by the cubic yard rather than the afternoon.
Is Adding Sand to Clay Soil a Good Idea?
No, adding sand to clay soil is not a good idea at the small ratios a homeowner can realistically achieve, and it commonly makes drainage worse rather than better. This is worth stating plainly, because plenty of published advice says the opposite.
The mechanism is simple. Fine clay particles fill the gaps between sand grains, and the resulting matrix packs denser than either material alone. Small amounts of sand worked into clay produce something closer to a hard, low-permeability layer than to loam. The mixes described in the section above work because sand is the dominant component by a wide margin and the blend is built off-site, not because sand was scattered over existing ground and tilled in.
Organic matter is the amendment that reliably improves clay in place. Compost feeds soil biology, and the resulting aggregation opens pore space that persists. Improving clay soil is a slow biological process rather than a fast mechanical one, and treating it as mechanical is the mistake behind most failed attempts.
What Is the Best Soil Improver for Clay Soil?
The best soil improver for clay soil is well-finished compost, applied to the surface and worked in gradually rather than tilled deeply in one pass. Compost supplies organic matter that binds clay particles into larger aggregates, and the spaces between those aggregates are what water and air move through. Leaf mold, aged manure, and shredded bark all work through the same mechanism. Earthworms and soil microbes then continue the incorporation, which is why patient surface application outperforms aggressive tilling over a two to three year horizon.
Can You Put Topsoil on Top of Clay Soil?
Yes, you can put topsoil on top of clay soil, though a layer of topsoil sitting on undisturbed clay creates a boundary that water struggles to cross. Water moves poorly from a finer-textured layer into a coarser one and from a looser layer into a denser one, so roots and moisture tend to stall at the interface rather than continuing down.
Blending the boundary solves it. Scarify or fork the clay surface before adding topsoil, and mix the first few inches of new material into the existing ground so there is a transition zone rather than a hard line. In a rain garden basin specifically, the excavated depth means you are largely replacing rather than layering, which sidesteps the problem entirely.
How Much Topsoil to Put Over Clay?
Put 4 to 6 inches of topsoil over clay for general planting beds, and 2 feet or more of engineered media in a rain garden basin. The two numbers serve different purposes. A planting bed needs enough depth for root establishment. A rain garden basin needs enough media volume to store and filter a storm's worth of water before it reaches the native soil or the underdrain below.
Can You Just Compost on Top of Clay Soil?
Yes, you can compost on top of clay soil, and layering compost on the surface is one of the most effective long-term clay treatments available. Earthworms and soil organisms pull organic matter downward over successive seasons, opening channels as they go. This approach is slow, taking two to three years to change how the soil behaves, and it is best suited to beds and lawn areas rather than a rain garden basin that needs to function this year.
What Plants Tolerate Heavy Clay Soil?
Plants that tolerate heavy clay soil in a rain garden include blue flag iris, Joe Pye weed, cardinal flower, buttonbush, sweetspire, river oats, and switchgrass, arranged by how much moisture each zone of the basin holds. Rain gardens swing between saturated and dry, so the plants have to handle both. Mississippi State Extension's Gulf South list applies well to North Alabama conditions.
- Wet center: Blue flag iris, cardinal flower, Louisiana iris, swamp milkweed, soft rush, spikerush. These sit in the deepest part and tolerate standing water for a day or two.
- Moist transition slopes: Joe Pye weed, swamp sunflower, blazing star, obedient plant, river oats, blue sedge. This band spends most of the year merely damp.
- Dry upper rim: Little bluestem, muhly grass, coreopsis, goldenrod, Stokes aster. The rim rarely floods and dries out fastest, so drought tolerance matters more than water tolerance here.
- Shrubs for structure: Buttonbush, sweetspire, summersweet, yaupon holly, chokeberry. Shrubs anchor the planting visually and root deeply enough to reach through amended media into the clay below.
- Trees, only in larger basins: Bald cypress, river birch, sweet bay magnolia, willow oak. Trees require a planting bed 4 feet deep rather than 2, so they belong in generously sized gardens.
Native species outperform ornamentals here because they evolved in local rainfall patterns and soil chemistry. Selecting hardy, low maintenance plants matters more in a rain garden than in a conventional bed, since the basin is deliberately exposed to conditions that kill fussy plants.
Can You Plant Straight Into Clay Soil?
Yes, you can plant straight into clay soil using species adapted to it, and clay-tolerant natives often establish better in unamended clay than in a small pocket of improved soil. Digging a generous hole, backfilling with rich compost, and setting a plant in the middle creates what growers call a bathtub effect, where water enters the amended pocket and cannot leave through the surrounding clay. Roots then circle inside the pocket rather than pushing outward. Planting into native clay with a wide, shallow hole and mulching the surface avoids that trap.
How Deep-Rooted Plants Fix Clay Over Time
Deep-rooted native plants raise the infiltration rate of clay soil substantially over several years, and the effect is large enough to change what the soil is capable of. A USGS study cited by the US EPA measured the median infiltration rate of a clay soil planted with prairie species at 0.88 inches per hour, more than three times the 0.28 inches per hour measured in the same clay planted with turfgrass.
Three times the infiltration rate is the difference between a basin that fails the 0.5 inch per hour threshold and one that clears it comfortably. Deep-rooted natives push channels through compacted clay as they establish. Root channels stay open after individual roots die back, leaving permanent pathways through the profile. Water moving through those pathways carries oxygen and organic matter deeper into the soil, which feeds the biology that keeps the channels from closing again.
This is the reason a clay rain garden improves rather than degrades. Both build paths converge here: an amended basin gets progressively more permeable, and an underdrained basin gradually relies on its pipe less. A patio or a drain performs at its best the day it is finished. A planted basin performs at its worst the day it is finished and gets better every season after.
How Long Should Water Stand in a Rain Garden?
Water should stand in a rain garden no longer than 48 hours after the storm ends, and 24 hours is a better target. The 48-hour figure is the required drawdown time in published bioretention design standards, measured from peak water level.
Water lingering past that window is diagnostic. It means the infiltration rate was overestimated, the basin was undersized for its watershed, the media got compacted during construction, or sediment has sealed the surface. A basin holding water for days is doing the same thing as any other patch of standing water in the yard, just inside a nicer border.
Do Rain Gardens Breed Mosquitoes?
No, properly built rain gardens do not breed mosquitoes, because mosquitoes need 72 hours or more of standing water to complete their life cycle and a functioning basin drains within 48. The 24-hour margin between those two numbers is the entire answer to the most common objection homeowners raise. A rain garden that does breed mosquitoes is a rain garden that is not draining, which is a maintenance or design failure rather than an inherent property of the feature.
Rain Garden Maintenance in Clay Soil
Maintain a rain garden in clay soil by watering weekly through the first two growing seasons, pulling weeds by hand, refreshing mulch annually, and timing drawdown after storms to catch problems early. Maintenance load drops sharply once the planting establishes.
Year one is the demanding one. New plantings need about an inch of water per week when rain does not supply it, and weeds have to be pulled by hand rather than hoed, since disturbing the surface compacts clay and undoes infiltration. Year two is lighter. By year three the root systems are deep enough that the basin largely runs itself, and the infiltration gains described above start showing up in faster drawdown.
Local conditions set the pace. Huntsville sits in USDA Hardiness Zones 7b and 8a, and the heavy Tennessee Valley clay under most yards here is slow enough that many sites test below the underdrain threshold on the first perc test. On the Madison properties we have planted, the same basins routinely draw down noticeably faster by their third summer as the root network opens the profile.
Timing the drawdown is the single most useful habit. Note when a storm ends, check the basin the next morning and again the following morning, and any basin still holding water at 48 hours needs attention before the next season rather than after. Where the cause turns out to be site-wide rather than basin-specific, a broader drainage system is usually the honest answer rather than a bigger hole.
Frequently Asked Questions
How Long Does It Take for Clay to Turn Into Topsoil?
Clay does not turn into topsoil, though consistent organic matter additions can make it behave like good garden soil within two to three years. The mineral fraction stays clay permanently, since particle size does not change. What changes is structure, as organic matter binds fine particles into larger aggregates with pore space between them. Annual compost applications and deep-rooted plantings are what drive that change.
What Can You Use Instead of Topsoil?
You can use compost, leaf mold, aged manure, or a commercial garden soil blend instead of topsoil. Compost outperforms most bagged topsoil for improving clay, because it carries far more organic matter and active biology. For a rain garden basin specifically, a sand-dominant engineered media matters more than topsoil, since the mix has to hit a target infiltration rate rather than simply grow plants.
Is Bagged Topsoil Any Good?
Bagged topsoil varies widely in quality, and much of it is screened fill with minimal organic content. Check the bag for an organic matter percentage and avoid products that list only sand or unspecified soil. For any volume beyond a few beds, bulk screened topsoil from a soil yard is both better characterized and easier to inspect before it goes in the ground.
What Is the Cheapest Way to Get Garden Soil?
The cheapest way to get garden soil is to make compost on site from yard waste and kitchen scraps, then blend it into what you already have. Many municipalities also offer free or low-cost compost and mulch from collected yard debris. Buying in bulk by the cubic yard rather than by the bag lowers unit cost substantially for anything larger than a small bed.
How Do You Make Homemade Topsoil?
You make homemade topsoil by composting organic material until it fully breaks down, then blending it with existing mineral soil at roughly one part compost to two or three parts soil. Leaves, grass clippings, and garden trimmings all work as feedstock. Finished compost should be dark, crumbly, and free of recognizable material, which typically takes six months to a year depending on how often the pile gets turned.
What Happens When a Rain Garden Overflows?
When a rain garden overflows, excess water leaves through the overflow notch in the berm and continues downhill along the route you planned for it. Overflow is normal and expected, since basins are sized for common storms rather than for the largest possible one. A garden without a designed overflow sends that water over the weakest point in the berm instead, which erodes the berm and can send runoff somewhere unwelcome.
The Short Version
Clay soil changes the build rather than ruling it out. Run the percolation test first, because that number decides everything downstream: above 0.5 inches per hour you can amend and plant, below it you add a perforated underdrain and a planned outlet. Size the basin to the watershed feeding it, pond no more than 4 to 6 inches on clay, skip the sand-into-clay shortcut in favor of compost, and plant deep-rooted natives that will triple your infiltration rate over the next few years.
The part worth getting right on the first attempt is the water math, since a basin sized or sited wrong moves a drainage problem rather than solving it. If you would like someone to run the test, size the basin, and figure out where the overflow should go before anything gets dug, we are glad to take a look. You can see more of our work at White Shovel Landscapes or reach us at 256-612-4439.



You May Also Like

Sep 12, 2026
3 min
How to Keep Landscape Edging Straight

Sep 11, 2026
3 min
How to Decorate a Patio: Ideas for 2025 and 2026
Sep 9, 2026
3 min
How to Trim Around Landscape Edging
Sep 7, 2026
3 min
What Does a Lawn Look Like After Aeration
Stay Connected and Inspired
Get the latest landscaping tips, seasonal care guides, and exclusive offers delivered straight to your inbox. Don’t miss out on expert advice and ideas to transform your outdoor spaces.
Sign Up for Our Newsletter Today!




Transforming Huntsville & Madison yards since 2010 with expert landscape design, garden makeovers, mulching, and top-quality installations.


