Providing Best Services in Huntsville & Madison, AL
.webp)
.webp)
Follow us on Social.


.webp)
.webp)
.webp)

Jan 28, 2026
.webp)
3 Min
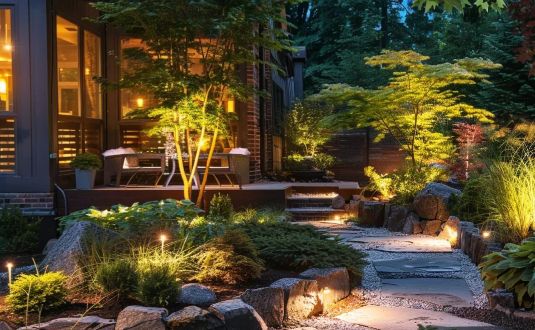
Landscape Lighting Rule of Thumb
The basic rule of thumb for landscape lighting is to space pathway lights 6 to 8 feet apart and use 100 to 200 lumens for safe, clear walkways. For accent lights that highlight trees or garden features, place them 10 to 15 feet apart with about 120 lumens. This simple guide helps you create a yard that looks great at night and keeps your family safe.
Why Landscape Lighting Rules Matter
Think of landscape lighting like painting. Too little light, and you can't see anything. Too much light, and it's blinding. The right amount creates beauty and keeps everyone safe. Understanding basic rules helps you make smart choices about where to put lights, how bright they should be, and which types work best for different areas of your yard.
Good lighting rules help you walk safely on paths and steps at night. They show off your favorite trees and plants. They keep your home more secure. They add value to your property. They save money by not over-lighting.
Outdoor lighting is one of the top features buyers look for in a home. Getting it right matters.
The Basic Spacing Rules You Need to Know
Spacing is the most important rule in landscape lighting. Put lights too close together, and you waste money and create harsh brightness. Space them too far apart, and you get dark spots where people might trip. The right spacing depends on what type of light you're using and what you're trying to light up. Here are the main spacing guidelines for different situations.
Pathway Lights: Keep Your Steps Safe
For pathway lights along walkways, driveways, or garden paths, space them 6 to 8 feet apart. This creates even light without dark spots where someone might trip.
If your path has curves or goes uphill, you might need to place lights a bit closer together. Add an extra light where the ground dips or turns so no one walks into darkness.
Place lights at the start and end of paths. Your first and last light should sit right at the beginning and end of the walkway. This tells people where to go.
Consider the light spread. Brighter lights with wider beams can sit farther apart. A 100-lumen light might need 6 feet between each one. A 200-lumen light could stretch to 8 or even 10 feet.
Accent Lights: Show Off Your Best Features
Accent lights make trees, statues, or cool parts of your home stand out. Place them 10 to 15 feet apart for most garden features. This gives each spotlight room to shine without crowding.
Get closer for small items. If you're lighting a small fountain or garden statue, move lights to about 3 to 6 feet away.
Go farther for tall trees. Big oak trees or tall pines might need lights 15 to 20 feet apart to cover their height and width.
Deck and Step Lights: Safety First
Steps and decks need special care because falls can really hurt people. Space step lights 4 to 6 feet apart. Each step or small landing should have enough light to see clearly.
Put lights on every other step or along both sides. This creates a clear path that's easy to follow even in complete darkness.
Keep deck lights 8 to 10 feet apart. This covers the whole deck area without creating harsh shadows where people might bump into furniture.
How Bright Should Your Lights Be?
Brightness is measured in lumens. More lumens means brighter light. Picking the right brightness level makes a huge difference in how your yard looks and functions at night. Too dim, and you can't see clearly. Too bright, and it hurts your eyes and washes out the natural beauty of your landscape. Different areas need different brightness levels. Here's what works for each type of outdoor light.
The Basic Brightness Chart
Choosing the Right Brightness for Each Space
For pathways, stick with 100 to 200 lumens. This gives enough light to see where you're walking without making it feel like daytime. Think of it as a gentle glow that guides your steps.
For security lighting, go brighter with 700 to 1,300 lumens. Bright lights surprise intruders and help you see clearly around your home. Just point them down and away from neighbors' windows.
For garden accents, use 50 to 300 lumens depending on what you're lighting. A small rosebush needs less light than a 40-foot oak tree. Start lower and add more if needed.
LED lights are the best choice for outdoor spaces because they use 75% less energy than old bulbs and last 25 times longer.
Different Types of Landscape Lights and When to Use Them
Not all landscape lights do the same job. Some light pathways for safe walking. Others highlight special features like trees or water fountains. Some spread light across big areas. Knowing which type of light to use in each spot helps you create a yard that looks amazing and works well. Each type has its own best uses and installation tips.
Path Lights: Your Main Walking Guides
Path lights are short poles with lights on top. They sit along walkways and mark where to go.
Height matters. Keep path lights 14 to 24 inches tall. This height lights the ground without shining in people's eyes.
Style matters too. Pick lights that match your home's look. Modern homes look great with simple, clean-lined fixtures. Traditional homes might want more decorative styles.
Spotlights: Make Features Pop
Spotlights have narrow beams that focus on one thing. Use them to highlight trees, walls, or special garden features.
Angle them up from the ground. Place spotlights 6 to 18 inches from the base of what you're lighting. Point them slightly up to create drama.
Use the right beam angle. Narrow beams (15 to 30 degrees) work for tall, thin objects. Wide beams (60 degrees or more) cover large areas like walls or wide tree trunks.
Flood Lights: Light Up Large Areas
Flood lights spread light across big spaces. They're perfect for driveways, backyards, or anywhere you need lots of coverage.
Mount them high. Put flood lights on your house, garage, or tall poles so they can reach far.
Add motion sensors. Motion-activated flood lights save energy and surprise anyone walking up to your home. They turn on only when needed.
Deck and Step Lights: Built-In Safety
These lights install right into steps or deck boards. They create a clean look and light exactly where feet land.
Install them flush. Deck lights sit flat with the surface so no one trips on them.
Use warm colors. Warm white lights (2,700K to 3,000K) feel inviting and work well with wood tones.
Popular Lighting Techniques That Look Amazing
Beyond just putting lights in the ground, professional landscapers use special techniques to create stunning effects. These methods transform ordinary yards into beautiful nighttime spaces that feel magical. Each technique creates a different mood and highlights different features. Learning these basic techniques helps you design lighting that really stands out.
Uplighting: Show Off Tall Features
Uplighting means putting lights on the ground and pointing them up. This technique makes trees, walls, and tall plants look impressive at night.
Place lights at the base. Set uplights 6 to 18 inches from what you're lighting. The closer they are, the more dramatic the shadow.
Use narrow beams for tall trees. A 10 to 25-degree beam works great for pine trees or columns. Wide beams (30 to 60 degrees) suit oak trees or house walls.
Moonlighting: Create Natural-Looking Light
Moonlighting copies the soft glow of moonlight. You mount lights high in trees and point them down through the branches.
Mount lights 10 to 15 feet up. The higher the light, the more it looks like real moonlight filtering through leaves.
Use cooler color temperatures. Natural moonlight is around 4,000K. Pick bulbs close to this number for the most realistic effect.
Keep it subtle. Moonlighting should create gentle shadows and soft light, not bright pools. Use lower wattage bulbs.
Wall Grazing: Add Texture and Drama
Wall grazing highlights bumpy surfaces like stone or brick. Place lights close to the wall and angle them up or down to create shadows.
Set lights 6 to 12 inches from the wall. This makes the texture really stand out.
Point them up or down. Both directions work. Pointing up tends to look more dramatic.
Silhouette Lighting: Create Mystery
This technique puts a light behind something to create a dark outline. It works beautifully with interesting tree shapes or statues.
Place lights behind the object. Put your spotlight or flood light on the ground behind what you want to silhouette.
Shine it on a wall or fence. You need a flat surface behind the object to catch the shadow.
Common Mistakes to Avoid
Even with good planning, it's easy to make mistakes with landscape lighting. These errors waste money, create problems with neighbors, or make your yard look worse instead of better. Learning what not to do is just as important as knowing what to do. Here are the biggest mistakes people make and how to avoid them.
Too Many Lights in One Spot
More isn't always better. Too many lights create glare and wash out your yard's natural beauty.
Focus on key features. Pick 3 to 5 main things to light. Don't try to light everything.
Leave some areas dark. The contrast between light and shadow creates interest and depth.
Lights That Blind You
If you can see the bulb, it's in the wrong spot or needs a shield.
Point lights down and away. Most outdoor lights should aim down toward the ground or at a feature, never at eye level.
Use fixtures with built-in shields. Many quality lights have hoods or guards that block glare.
Forgetting About Your Neighbors
Bright lights that shine into neighbors' windows cause problems and complaints.
Aim carefully. Make sure your lights stay on your property and don't spill into neighbors' yards.
Use lower wattage near property lines. Keep brighter lights closer to your home.
Ignoring Wire Length and Power
Planning light placement without thinking about power sources creates headaches later.
Map out your transformer location first. Low-voltage systems need a transformer that plugs into outdoor outlets.
Stay within wire length limits. Most low-voltage wire works well up to 100 feet from the transformer. Going longer makes lights dimmer.
Special Situations and How to Handle Them
Not every yard is flat and simple. Hills, curves, mature trees, and other features create special challenges for lighting. These situations need extra thought and planning to get right. The basic rules still apply, but you need to adjust them for your yard's specific layout and features.
Lighting Sloped or Hilly Yards
Hills and slopes need extra attention. Water runs downhill, and shadows fall differently.
Add extra lights where ground dips. Dark valleys in your yard need more light to stay visible.
Angle lights carefully on slopes. Lights pointing straight down on a hill won't reach far. Angle them to follow the slope.
Watch for water runoff. Make sure lights and wires sit above areas where water flows. If you notice standing water pooling in low spots, you might need to address drainage before adding permanent lighting.
Curved or Winding Paths
Straight lines are easy. Curves take more planning.
Place lights on the outside of curves. This shows people where the path turns.
Add one at the curve's peak. The sharpest part of any curve needs a light to guide feet safely around.
Stagger lights along both sides. Instead of lining them up straight across, offset them so each light reaches farther down the path.
Areas With Existing Trees and Plants
Mature landscaping is beautiful but makes lighting tricky.
Work around roots. Don't dig deep holes near tree roots. Use stake lights that don't need much depth.
Light through branches, not around them. Use the natural shapes of trees to create interesting light patterns.
Consider seasonal changes. Trees with leaves in summer but bare branches in winter will look different. Plan for both seasons.
Energy-Saving Tips for Landscape Lights
Outdoor lights run every night, which can add up to big electric bills. Smart choices about bulbs, timers, and controls help you save money while still lighting your yard beautifully. These energy-saving tips pay for themselves over time and help the environment too.
Choose LED Bulbs Every Time
LED bulbs cost more upfront but save tons of money over time.
LEDs use 75% less electricity than old incandescent bulbs. That's a huge savings on your power bill.
They last 25 times longer. You'll replace LED bulbs far less often, which means less work and waste.
They stay cooler. LED bulbs don't get as hot, making them safer around plants and wood.
Add Timers and Smart Controls
Timers turn lights on and off automatically. Smart controls let you manage everything from your phone.
Use dusk-to-dawn sensors. These turn lights on when it gets dark and off at sunrise. No more forgetting to flip switches.
Try smart bulbs with apps. Adjust brightness, set schedules, and even change colors from anywhere.
Add motion sensors for security lights. They turn on only when someone walks by, saving energy most of the night.
Consider Solar Options for Some Areas
Solar lights work great in sunny spots far from power outlets.
Use them for path marking. Small solar path lights handle light-duty marking along walkways.
Pick quality solar panels. Cheap solar lights barely glow. Good ones charge fully and shine bright for 6 to 8 hours.
Know their limits. Solar lights work poorly in shady areas or during short winter days. Mix solar with wired lights for best results.
Planning Your Landscape Lighting Project
Good planning prevents expensive mistakes and makes installation go smoothly. Taking time to map out your lighting before you buy anything saves money and headaches. A solid plan helps you figure out what you need, where it goes, and how much it costs.
Start With a Sketch
Before buying anything, draw a simple map of your yard.
Mark all pathways and steps. These need light for safety, so they come first.
Circle features you want to highlight. Trees, garden beds, water features, or cool parts of your home's design.
Note where power outlets are. This helps you figure out where transformers can go and how much wire you need.
Set a Realistic Budget
Landscape lighting costs vary widely based on quality and how much you install.
Basic path lighting runs $200 to $500 for simple setups with 6 to 10 lights. Mid-range full yard installations cost $1,000 to $3,000 for pathways, accent lights, and some special features. High-end professional installs range from $3,000 to $10,000 or more for complete systems with smart controls and premium fixtures.
Installing lights yourself saves labor costs but takes time and skill. Hiring pros costs more but guarantees safety and proper results.
Test Before You Commit
Many professionals offer free demonstrations or let you try lights in place before buying.
Ask to see lights at night. Photos don't show how lights actually look. Visit after dark or request an evening appointment.
Start small and add more later. Begin with key areas and expand as budget allows. Lighting is easy to add to over time.
Buy quality fixtures. Cheap lights fail fast and cost more to replace. Good lights last 10 to 20 years or longer.
Maintaining Your Landscape Lights
Installing lights is just the start. Regular maintenance keeps them working well and looking great for years. Simple cleaning and checks prevent big problems and expensive repairs down the road. Taking care of your lights is easy and doesn't take much time.
Regular Cleaning Keeps Lights Bright
Dirt, leaves, and bugs dim lights over time.
Clean fixtures every 3 to 6 months. Wipe down lenses and remove any debris blocking light.
Check for rust or damage. Replace cracked lenses or rusted fixtures before they fail completely.
Trim plants around lights. Bushes and trees grow. Keep branches away from fixtures so light shines through clearly.
Replace Bulbs as Needed
Even LED bulbs eventually burn out.
Keep spare bulbs on hand. Buy extras when you install new lights so replacements are ready.
Replace all bulbs in a set together. This keeps color and brightness consistent across your whole lighting system.
Upgrade to better bulbs when replacing. LED technology keeps improving. New bulbs often work better than ones from a few years ago.
Check Connections and Wires Yearly
Outdoor conditions are harsh on electrical connections.
Look for exposed wires. Dirt settles and mulch washes away. Cover any wires that show through.
Test all connections. Make sure wires stay firmly attached to fixtures and transformers.
Replace damaged wire immediately. Cold weather creates cracks. Animals sometimes chew through wire. Fix problems before they cause shorts or fires.
Final Thoughts
Getting landscape lighting right comes down to following a few simple rules. Space pathway lights 6 to 8 feet apart with 100 to 200 lumens for safe walking. Use accent lights 10 to 15 feet apart to highlight your favorite features. Pick the right brightness for each job, and always aim lights down to avoid glare.
Remember that great outdoor lighting creates a balance. You want enough light to see safely and show off your yard's beauty, but not so much that it feels like a parking lot. Start with basic pathway and security lights, then add accent lights to make your home truly special.
Ready to transform your outdoor space with beautiful lighting? Whether you're starting fresh with professional landscape design or adding lights to existing features, proper planning makes all the difference. If you're dealing with muddy areas that need better drainage before installing lights, addressing those issues first creates a better foundation. A well-designed lighting system not only makes your yard shine but also increases your home's value and keeps your family safe. Contact White Shovel Landscapes today for expert help with all your outdoor lighting and landscaping needs.
.webp)

.webp)


You May Also Like


Jun 10, 2026
How to Improve Drainage in Clay Soil

Jun 10, 2026
What Is Lawn Aeration and When Does Your Yard Need It

Jun 10, 2026
How to Fix Bare Spots in Your Lawn

Jun 5, 2026
Topsoil vs Fill Dirt for Yard Leveling
Stay Connected and Inspired
Get the latest landscaping tips, seasonal care guides, and exclusive offers delivered straight to your inbox. Don’t miss out on expert advice and ideas to transform your outdoor spaces.
Sign Up for Our Newsletter Today!
.webp)


.webp)

Transforming Huntsville & Madison yards since 2010 with expert landscape design, garden makeovers, mulching, and top-quality installations.


