Providing Best Services in Huntsville & Madison, AL


Follow us on Social.





Sep 1, 2026


Edging & Borders
How to install landscape edging
You install landscape edging by marking a clean border line, digging a trench 4 to 6 inches deep, setting the edging material with the top sitting half an inch above the finished grade, anchoring it with stakes driven at a 45-degree angle, and backfilling both sides with compacted soil. Proper installation keeps edging straight, stable, and functional for years. According to Homewyse, the national average cost to install landscape edging runs $3.50 to $9.38 per linear foot professionally, while DIY installation saves $2 to $5 per linear foot by eliminating labor costs. A typical 150-foot residential project takes a professional crew about one day and a DIY homeowner a full weekend, according to Builds and Buys. This guide walks through the full installation process, covers material-specific methods for metal, stone, and brick, explains how to handle slopes and curves, and lists the mistakes that cause edging to fail.
Which Type of Edging Is Best for Your Yard?
The best edging depends on the look you want, how long the border has to last, and how much digging you are willing to do. Pick the material before you pick up a shovel, because it decides the trench depth, the base and the tools. The table compares the common options; prices vary too much by job to list here, so ask for a quote on your yard.
For most beds, steel is the best all-round choice: it disappears into the landscape, holds a curve and outlasts plastic by years. Plastic is fine for a quick or temporary border. Brick, stone and concrete cost more and take more work, and they last the longest when they sit on a compacted base. If string trimming along a border is the chore you want to end, choose mow-over edging, covered below.
How to Install Landscape Edging Step by Step
Installing landscape edging follows the same basic sequence regardless of material. The steps below apply to metal, plastic, and rubber edging. Stone, brick, and paver edging require additional preparation covered in later sections. Always install edging before adding mulch, not after. Edging acts as a mulch barrier, and installing it first creates the 2-to-3-inch height difference between the lawn and the bed that makes edging effective. Properties that need flower bed edging benefit most from getting the installation right the first time.
- Mark the border line using spray paint, a garden hose, or a string line stretched between stakes. A string line produces the straightest results on long runs. For curved beds, lay a garden hose in the shape you want, adjust the curves until they look smooth, then spray paint along the hose. Step back and view the line from a distance before committing to it.
- Cut along the marked line with a flat-edged spade to sever the turf cleanly. Remove a 4-to-6-inch-wide strip of sod along the entire border. Never install edging directly over existing grass. Grass grows through, around, and eventually pushes up any edging laid on top of it.
- Dig a trench 4 to 6 inches deep along the cut line. Keep the trench walls as vertical as possible on the bed side to give the edging a flat surface to rest against. The bottom of the trench should be level and smooth. In hard clay soil, wetting the ground a day before trenching softens the soil and makes digging easier.
- Add a 1-inch layer of sand or crushed gravel to the bottom of the trench for drainage, especially in clay-heavy soil. This base layer prevents water from pooling behind the edging and reduces frost heaving in winter. Skip this step only if your soil drains well naturally.
- Place the edging into the trench with the top bead or lip sitting approximately half an inch above the finished grade of the lawn. This slight height difference keeps mulch inside the bed and grass out. Check the height with a tape measure or level as you go.
- Drive stakes through the edging at a 45-degree angle toward the trench wall. Space stakes every 18 to 24 inches on straight runs, according to Rivendell Distribution. Use extra stakes at every joint where two pieces connect and at every curve. Leave about 2 inches of the stake undriven so it grips the edging securely without poking through.
- Connect edging sections using the overlap method or the manufacturer's supplied connectors. Apply PVC cement to plastic joints before inserting the connector clip. For metal edging, overlap sections by 4 to 6 inches and drive a stake through both layers at the joint.
- Backfill both sides of the edging with the excavated soil. Compact the backfill firmly by tamping with the flat of your spade or a hand tamper. Proper compaction prevents the edging from leaning, shifting, or popping out of the trench. Clean up excess soil and debris from the lawn surface.
How Deep Should Landscape Edging Be?
Landscape edging should be buried 4 to 6 inches deep for most materials, with the top of the edging sitting 0.5 to 1 inch above the lawn surface. UseCalcPro confirms that 3 to 4 inches is sufficient for basic lawn borders, while areas with heavy foot traffic or patio borders need 4 to 6 inches for extra stability. Shallow edging, anything less than 3 inches deep, heaves upward during freeze-thaw cycles, shifts from mower contact, and fails within months.
Depth varies slightly by material. Plastic roll edging performs adequately at 4 inches because it is lightweight and flexible. Steel and aluminum edging should be buried at least 5 inches to resist lateral pressure from expanding grass roots. Brick and stone edging need a full 6 inches, including a 1-to-2-inch compacted gravel base beneath the material, to prevent settling and uneven gaps.
Properties dealing with yard erosion near beds should dig an inch deeper than the standard recommendation and add a gravel base to manage water flow along the edging line. Erosion undermines shallow edging from below, causing sections to collapse or lean away from the bed.
How to Install Metal Landscape Edging
Metal landscape edging, available in steel and aluminum, produces a clean, nearly invisible border that professionals prefer for its durability and longevity. Steel edging lasts 15 or more years with powder coating or galvanizing, according to UseCalcPro. Aluminum costs more but will not rust and weighs less, making it easier to transport and position.
Follow the standard installation steps with these metal-specific adjustments. Wear heavy-duty leather gloves throughout the process because cut metal edges can be extremely sharp. Use tin snips or an angle grinder to cut metal edging to length. Fold or cap any exposed cut edges for safety. Drive steel stakes through the factory-punched holes at 18-to-24-inch intervals. On curves, bend the edging gradually by hand. Tight curves require making small relief cuts every few inches on the inside of the curve to allow the metal to flex without kinking.
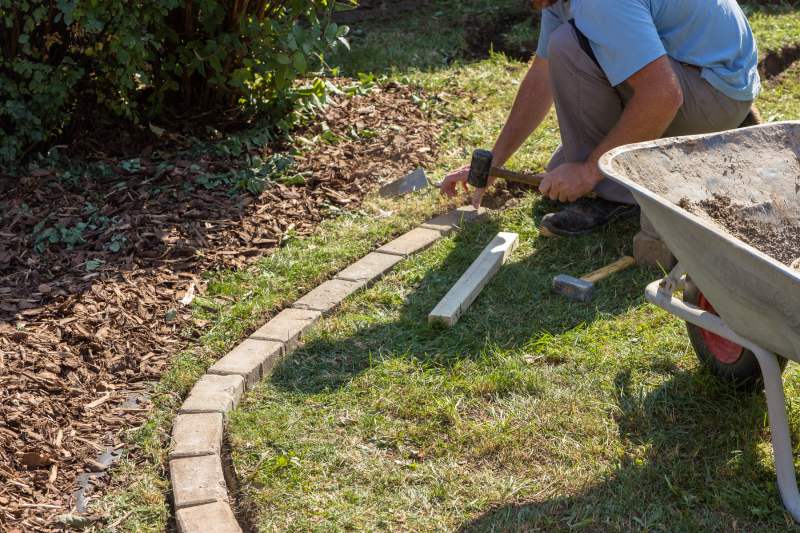
No-dig metal edging panels eliminate the trenching step entirely. These panels have built-in spikes that you pound directly into the ground with a rubber mallet. No-dig panels work well in loose or sandy soil but struggle in compacted clay because the spikes cannot penetrate hard ground without bending. Mow-over edging sits low enough that a mower wheel rolls across the top without catching, which eliminates the need for string trimming along the border.
How to Install Stone and Brick Landscape Edging
Stone and brick edging creates a wider, more visible border that doubles as a design element in the landscape. Installation requires more preparation than metal or plastic because each piece must be individually leveled and the base must support the weight of the material without shifting. Hardscaping projects like stone edging benefit from professional installation when the runs are long, the curves are tight, or the soil is rocky.
Dig a trench 6 to 8 inches deep and 2 inches wider than the stone or brick you are installing. Fill the bottom with 2 inches of compacted crushed gravel to create a stable, level base. Lay the first stone or brick on the gravel, check it with a level, and tap it into position with a rubber mallet. Set each subsequent piece tight against the previous one, checking level as you go. Fill gaps between stones with mortar or polymeric sand depending on the style you want.
Cutting stone or brick to fit corners and curves requires an angle grinder with a diamond blade or a masonry chisel and hammer for rough cuts. Score the cut line first, then break along the score. Dry-fit all pieces before applying mortar to confirm the layout looks right. Pair stone borders with rock and mulch combinations for a cohesive look that ties the edging into the rest of the bed design.
Mow-Over (Flush) Edging
Mow-over edging is a row of brick, pavers or poured concrete set flush with the lawn, wide enough for one mower wheel to ride along it. The mower blade cuts the grass right to the bed, so most of the string trimming along that border goes away.
It installs like the stone and brick edging above, with two differences. The top of each piece sits level with the soil on the lawn side, not above it, and the base has to be compacted firmly, because the mower wheel runs over it every week. Lay the pieces tight, check them with a level as you go, and fill the joints with polymeric sand so grass can't root between them.
The upkeep is small but real. Reset any piece that heaves or sinks before the mower catches it, and cut back bermuda or zoysia runners that creep across the top from the lawn side.
How to Install Landscape Edging on a Slope
Installing landscape edging on a slope requires a step-down approach that follows the grade change while keeping each section of edging level. Edging installed on a slope without adjustments leans downhill, pulls out of the ground, and channels water along the border instead of directing it away from the bed.
Start at the highest point of the slope and work downhill. At each grade change, overlap the higher section on top of the lower section by 4 to 6 inches. Stake both layers at the overlap with an extra stake driven through both pieces. The stepped overlap keeps the edging secure and prevents gaps where mulch escapes or grass invades.
Use extra stakes on slopes, spacing them every 12 to 16 inches instead of the standard 18 to 24 inches. The additional anchoring resists the downhill pressure that gravity and water flow place on the edging. Professional landscape installation handles slopes with grading corrections that reduce the steepness before edging goes in, which produces a more stable, longer-lasting result.
North Alabama's clay-heavy soils complicate slope installations because clay absorbs water and becomes slippery, which can push edging out of position during heavy rains. Adding a gravel base beneath the edging and improving drainage along the border prevents water from undermining the installation over time.
What Do Professionals Use for Landscape Edging?
Professionals use steel or aluminum edging for most residential projects because metal produces the cleanest lines, lasts the longest, and practically disappears into the landscape once installed. Rivendell Distribution notes that professional crews use steel with stakes at 18-to-24-inch centers for standard installations and switch to heavier gauge steel with closer stake spacing for commercial properties.
For high-end projects, professionals install natural stone or poured concrete curbing. Stone creates a visible design element that complements walkways and patios. Poured concrete allows custom shapes and colors through stamping and tinting. Both materials require specialized equipment and experience to install correctly, which is why landscape design services handle these installations rather than recommending them as DIY projects.
Professionals avoid thin plastic edging on permanent installations because it warps under summer heat, cracks in cold weather, and heaves out of the ground within a few seasons. Steel costs a little more per foot than plastic, but lasts far longer. That small upfront savings costs more in the long run when the plastic needs replacing.
What Are the Most Common Landscape Edging Mistakes?
The most common landscape edging mistakes lead to edging that shifts, heaves, leans, or fails within the first year. Avoiding these mistakes saves time, money, and the frustration of redoing work that should have lasted for years.
- Installing edging over existing grass instead of removing sod and digging a trench. Grass grows through and around any edging laid on top of it, pushing the material out of position within weeks. Always cut sod, dig a trench, and install below grade.
- Digging too shallow. Edging buried less than 3 inches pops up during freeze-thaw cycles, shifts when bumped by a mower, and provides no real barrier against grass roots. The minimum depth for lasting results is 4 inches.
- Using too few stakes. Edging manufacturers include a minimum number of stakes, but that minimum is often not enough for curves, slopes, or clay soil. Double the staking at joints and curves, and add extra stakes on any run longer than 10 feet.
- Skipping backfill compaction. Loose soil on either side of the edging allows it to lean under its own weight or under mower pressure. Compacting both sides locks the edging in position.
- Installing edging after mulching instead of before. Mulching first forces you to remove and redistribute material, wastes time, and prevents the edging from reaching proper depth. Edging always goes in before mulch.
- Eyeballing straight lines instead of using a string line or spray paint. Even experienced installers cannot hold a straight line over distances longer than a few feet without a guide. Wavy edging looks unprofessional and is the most visible sign of a rushed installation.
- Choosing the cheapest plastic without considering lifespan. Thin plastic edging is the cheapest option but lasts about 5 years. Steel costs more and lasts 15 or more years. The per-year cost of steel is lower than plastic over any timeframe longer than 7 years.
How Do You Hold Landscape Edging in Place?
You hold landscape edging in place with steel stakes driven at a 45-degree angle through the edging and into the trench wall, combined with compacted backfill on both sides. The stakes resist lateral movement, and the compacted soil provides continuous pressure that prevents the edging from lifting or leaning. Oly-Ola Edgings recommends staking at every pre-punched hole and adding extra stakes at every joint and every curve.
For metal edging, use 10-to-14-inch steel stakes. Longer stakes provide better holding power in loose or sandy soil. For brick and stone edging, the weight of the material combined with mortar or polymeric sand holds the pieces in place without stakes. A compacted gravel base beneath the stone is critical because it prevents settling that loosens the joints over time.
In areas with expansive clay soil, frost heaving pushes edging upward during winter when the clay absorbs moisture and expands. A 1-inch gravel drainage layer beneath the edging reduces heaving by allowing water to drain away from the base before it freezes. Checking edging alignment each spring and re-staking any shifted sections takes only a few minutes and prevents small problems from becoming full-length failures.
Frequently Asked Questions
What Is the Easiest Landscape Edging to Install?
The easiest landscape edging to install is no-dig metal or plastic panel edging that uses built-in spikes you pound directly into the ground with a rubber mallet. No-dig panels eliminate trenching entirely, which cuts installation time in half. LawnStarter notes that no-dig edging works best in soft, loamy soil. Hard clay or rocky ground may require pre-drilling or switching to a trench-based method.
Is It Better to Edge When the Ground Is Wet or Dry?
It is better to edge when the ground is moist but not saturated. Moist soil cuts cleanly with a spade and holds its shape in the trench, making installation easier and faster. Bone-dry soil resists the spade and crumbles, while waterlogged soil collapses and smears, preventing clean edges and proper backfill compaction.
How Much Does It Cost to Install Landscape Edging?
Professional landscape edging installation costs $3.50 to $9.38 per linear foot on average, according to Homewyse (May 2026 data). DIY installation costs $1.50 to $6 per linear foot for materials and basic supplies, according to LandscapioAI. The total for a typical front bed depends on its length, the material you choose and whether you install it yourself.
What Can You Use Instead of Landscape Edging?
Instead of manufactured landscape edging, you can create a natural edge by cutting a V-shaped trench 3 to 4 inches deep along the border of the bed using a flat-edged spade. This method, called a spade-cut or Victorian edge, produces a clean line at zero material cost. The tradeoff is that natural edges require re-cutting every 4 to 8 weeks during the growing season to maintain their shape, while installed edging requires no ongoing border maintenance.
Do You Install Edging Before or After Mulching?
Always install edging before mulching. Edging acts as a barrier that keeps mulch inside the bed and off the lawn. Installing edging first creates the correct height difference between the lawn surface and the mulch level. Installing edging after mulching forces you to remove and redistribute mulch, wastes material, and rarely achieves proper depth or alignment.
The Bottom Line
Landscape edging turns a messy border between your lawn and garden beds into a clean, permanent line that holds mulch in place, keeps grass out, and makes the entire yard look more polished. The installation process is straightforward: mark the line, dig a 4-to-6-inch trench, set the edging half an inch above grade, stake every 18 to 24 inches, and compact backfill on both sides. Steel edging offers the best combination of durability, clean appearance and long-term value for most residential yards, lasting 15 or more years.
If your yard needs new edging, bed renovation, or a full border redesign, White Shovel Landscapes can handle the installation from layout to cleanup so the lines come out straight, the stakes hold, and the borders last.
Call us at 256-612-4439 to schedule a free estimate.



You May Also Like

Sep 12, 2026
3 min
How to Keep Landscape Edging Straight
Sep 11, 2026
3 min
How to Decorate a Patio: Ideas for 2025 and 2026
Sep 9, 2026
3 min
How to Trim Around Landscape Edging
Sep 7, 2026
3 min
What Does a Lawn Look Like After Aeration
Have a Project in Mind?
If this post sounds like your yard, tell us about it. Request an estimate online or give us a call, and we’ll talk through what your property needs.





Transforming Huntsville & Madison yards since 2011 with expert landscape design, garden makeovers, mulching, and top-quality installations.


