Providing Best Services in Huntsville & Madison, AL


Follow us on Social.





Sep 7, 2026

3 min

Edging & Borders
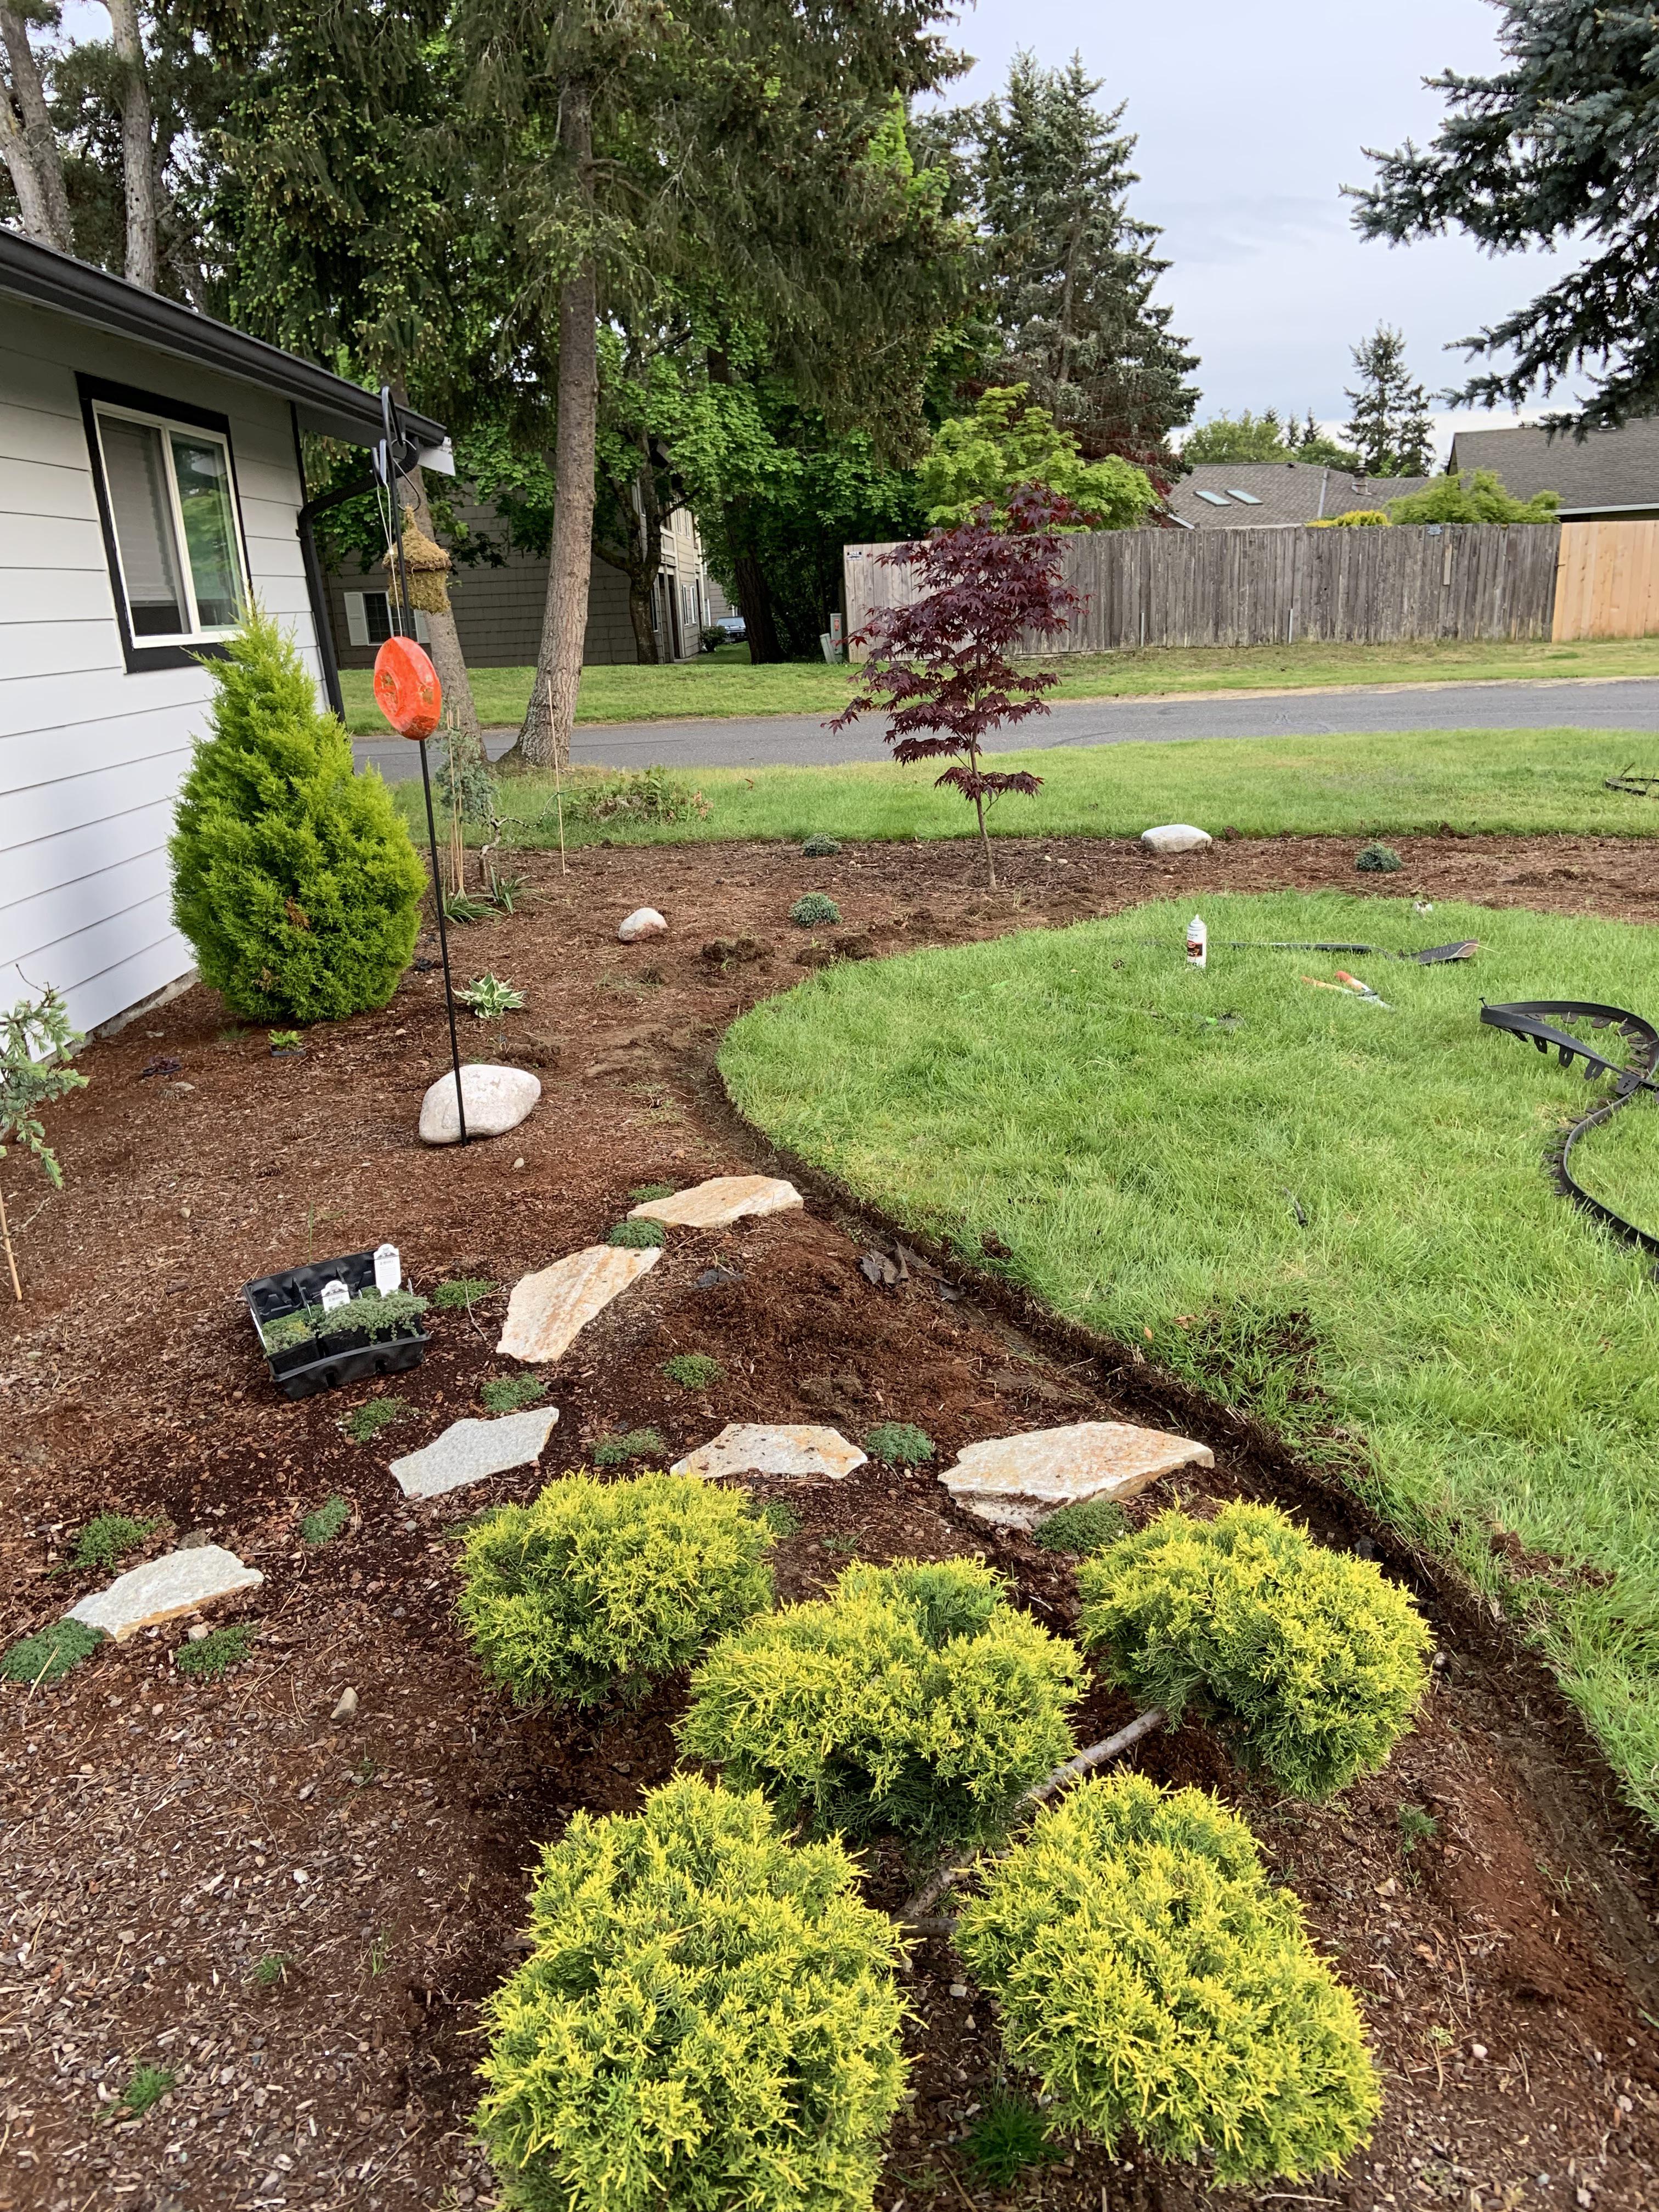
How to Dig a Trench for Landscape Edging
To dig a trench for landscape edging, cut a vertical edge 3 to 4 inches deep straight down on the lawn side, then make a 45-degree angle cut from the garden bed side to remove a soil wedge. The tools you need are a half-moon edger or flat spade for slicing turf, a flat-head shovel for removing soil, a garden hose or spray paint for marking curves, and a wheelbarrow for hauling sod and loose dirt. This technique, known as a Victorian trench edge, creates a clean V-shaped channel between your lawn and garden bed that keeps grass out of the bed and mulch out of the lawn. This article walks through the full step-by-step process, the right trench depth for different grass types, how to handle curves, how to maintain the edge over time, and how trench edging compares to plastic, metal, and stone alternatives.
What Is a Victorian Trench Edge?
A Victorian trench edge is a hand-dug V-shaped channel cut directly into the ground where the lawn meets a garden bed. The lawn side of the trench is cut vertically, and the bed side slopes at a 45-degree angle, creating a small trench that forms a visible shadow line between grass and planting area. The method requires no purchased materials, no plastic strips, and no metal inserts. A flat spade and some time are all it takes.
The technique has been used by professional gardeners and estates for over a century because it produces the cleanest transition between turf and beds. The V-shaped profile serves two functions at once. The vertical lawn-side wall stops grass roots and stolons from creeping into the bed. The angled bed-side slope holds mulch in place and allows mower wheels to ride along the top of the trench edge, eliminating the need for hand-trimming along the border. Properties with well-defined edging benefits consistently look more intentional and maintained than properties with blurred bed lines.
What Tools Do You Need to Dig a Landscape Edging Trench?
The tools you need to dig a landscape edging trench are a flat-edged spade or half-moon edger for the primary cuts, a flat shovel for lifting soil, a garden hose or spray paint for marking your line, and a wheelbarrow for removing debris. Each tool serves a specific role in the process, and using the right one for each step produces a cleaner, more consistent result.
- Half-moon edger: the best tool for cutting the initial vertical line. The curved blade slices cleanly through sod and roots with a single foot press. Half-moon edgers produce straighter, more consistent cuts than flat spades on long runs.
- Flat-edged spade: works well for both the vertical cut and the angled back cut. A flat spade is the most versatile option for homeowners who do not own a half-moon edger.
- Trenching shovel: a narrow-bladed shovel useful for tight curves and deep sections where a standard spade is too wide.
- Garden hose or rope: essential for marking curved bed lines before cutting. Lay the hose on the ground and adjust until the curve looks natural, then trace the line with marking paint.
- Marking paint or chalk: locks your line in place so it does not shift while you dig.
- Wheelbarrow: for hauling away removed sod wedges and loose soil.
Sharp tools make every step faster and cleaner. A dull spade tears sod instead of slicing it, leaving ragged edges that crumble within weeks. Sharpen your spade blade with a flat file before starting, and wipe the blade clean between cuts to prevent soil buildup that dulls the edge. Homeowners planning to install edging for the first time should invest in a quality half-moon edger, which costs $30 to $50 at most hardware stores and lasts for years with basic care.
What Type of Shovel Is Best for Digging a Landscape Edging Trench?
The best type of shovel for digging a landscape edging trench is a flat-edged spade with a sharp blade. A flat-edged spade produces the clean vertical cut that defines the lawn side of the trench. Round-point shovels dig well but create curved cuts that do not hold their shape as a clean edge. A half-moon edger outperforms a flat spade for long, straight runs because the curved blade maintains consistent depth with each press. For tight curves around trees and small beds, a narrow trenching shovel gives better control than a wide spade.
How to Dig a Landscape Edging Trench Step by Step
Digging a landscape edging trench follows a clear sequence that produces a consistent, professional-looking result when each step is completed before moving to the next. The entire process works from the outside in, starting with the line layout and finishing with mulch.
- Mark the boundary. Lay a garden hose or rope along the edge where your lawn meets the garden bed. Step back and look at the line from several angles. Adjust curves until they flow smoothly without tight, choppy turns. Once you are satisfied with the shape, trace the line with marking paint or chalk so it stays visible while you dig.
- Cut the vertical edge. Place your half-moon edger or flat spade on the lawn side of the marked line. Press the blade straight down to a depth of 3 to 4 inches. Step firmly on the shoulder of the tool to drive it into the turf. Keep each cut close to the previous one so there are no gaps in the line. The vertical cut creates the lawn-side wall of the trench.
- Make the angle cut. Move to the garden bed side of the trench. Push your spade into the soil at a 45-degree angle, cutting down to meet the bottom of your vertical cut. This angled slice removes a triangular wedge of sod and soil. The 45-degree angle is what creates the V-shape that holds mulch and defines the shadow line.
- Remove the soil wedge. Lift the triangular strip of sod and loose dirt out of the trench. Keep the pieces intact where possible so they are easier to transport. Toss the removed sod and debris into a wheelbarrow. Removed sod can be composted, used to patch bare spots elsewhere in the yard, or disposed of.
- Smooth the bed slope. Rake the inside of the bed to blend the angled cut into the existing bed surface. The bed soil should slope gently away from the trench, not pile up against the lawn-side wall.
- Add mulch. Spread 2 to 3 inches of mulch across the garden bed, allowing a small amount of mulch to rest in the bottom of the V-groove. The mulch fills the angled slope and finishes the edge with a clean, polished look. Keep mulch slightly below the lawn surface so it does not spill onto the grass.
The most important detail in the entire process is keeping the line continuous. A trench that looks like a single, smooth cut from start to finish reads as intentional and professional. A trench that looks like a series of short, disconnected segments reads as rushed. Step back every 5 to 10 feet to check your line before continuing. Homeowners who want a finished result that matches professional landscape installation standards should take this extra moment at each check point.
Can You Dig a Trench With an Edger?
Yes, you can dig a trench with a power edger, but the result differs from a hand-dug Victorian trench. A power edger creates a narrow, shallow cut that works well for maintaining an existing edge but lacks the depth and V-profile needed to establish a new trench border. Power edgers typically cut 1 to 2 inches deep, while a proper landscape edging trench needs 3 to 4 inches of depth on the vertical side. For creating a new trench from scratch, a hand-dug approach with a flat spade or half-moon edger produces a deeper, more defined edge. Power edgers work best as a maintenance tool to keep an already-established trench sharp between seasonal re-cuts.
How Deep Should a Landscape Edging Trench Be?
A landscape edging trench should be 3 to 4 inches deep on the vertical lawn side for most grass types. The Google AI Overview and multiple sources including Homestead Gardens and Capek's Landscaping confirm this as the standard depth for residential trench edging. Kansas State Extension and Southern Living Plants recommend 4 to 6 inches for a more durable edge that lasts longer between maintenance passes.
Grass type determines how deep to dig. Cool-season grasses like fescue and bluegrass have shallower root systems and spread primarily from the crown, so a 3-inch trench typically stops encroachment. Warm-season grasses like bermuda spread through both stolons above ground and rhizomes below ground, requiring a deeper 4-to-6-inch trench to intercept underground runners before they reach the garden bed. Properties across Alabama commonly have bermuda grass, which is one of the most aggressive spreading grasses in residential lawns.
Soil type also affects trench depth. Clay-heavy soil holds its shape well but requires more effort to cut. Sandy soil crumbles more easily and may need a slightly deeper trench to compensate for the edges breaking down faster between maintenance sessions. Professional soil amendment work before installing beds can improve the structural integrity of trench edges in loose or sandy soil conditions.
How Wide Should a Landscape Edging Trench Be?
A landscape edging trench should be approximately 3 to 4 inches wide at the top of the V-shape, tapering to a point at the bottom where the vertical cut meets the angled cut. The width is a natural result of the depth and angle rather than something you measure separately. A 3-inch-deep vertical cut paired with a 45-degree angle cut produces a trench that is roughly 3 inches wide at the surface. A 4-inch-deep vertical cut produces a slightly wider trench of about 4 inches at the surface. Wider trenches are harder to maintain and can look out of proportion on small beds, so match your trench width to the scale of the garden.
How to Dig a Landscape Edging Trench for Curved Beds
Digging a landscape edging trench for curved beds starts with the layout. A garden hose is the best tool for designing curves because you can adjust it endlessly until the shape looks right. Lay the hose on the ground and walk around the bed at different angles to see how the curve reads from the street, the driveway, and the front door. Gentle, sweeping curves look more natural and professional than tight, choppy turns.
Once the curve is set, trace it with marking paint and remove the hose. Cut the vertical edge first, following the painted line in short, overlapping strokes. Short strokes give more control on curves than long, continuous pushes. The angled back cut follows the same curve from the bed side. Tight curves require a narrow trenching shovel or hand trowel because a standard spade blade is too wide to follow the radius without distorting the line. A well-designed curved bed transforms a flat yard into a space with depth and flow. Professional landscape design often starts with bed shape and edging before plant selection because the border defines the structure of the entire space.
Trench Edging vs. Plastic vs. Metal vs. Stone Edging
Trench edging, plastic edging, metal edging, and stone edging each serve the same basic purpose of separating lawn from garden bed, but they differ significantly in cost, durability, appearance, and maintenance requirements. The right choice depends on budget, the style of the landscape, and how much upkeep you are willing to do over time.
Edging TypeCost Per Linear FootLifespanMaintenanceBest ForTrench (Victorian)$0 (labor only)Indefinite with seasonal re-cutsRe-cut 1-2x per growing seasonAny style; natural, mower-friendly lookPlastic Strip$1 - $33-5 years before warping/heavingReposition after freeze-thaw cyclesBudget projects; straight runsMetal Strip$3 - $810-15 yearsOccasional repositioning; rust checkModern, clean-line designsStone or Brick$10 - $3020+ yearsHand-trim grass along edge; reset shifted stonesFormal landscapes; permanent borders
The NAR 2023 Remodeling Impact Report found that routine lawn maintenance, including edging and mulching, delivers 104-217% return on investment at resale. Trench edging costs nothing in materials and delivers the same curb appeal impact as purchased edging products when maintained properly. Plastic edging is the most affordable purchased option but warps and heaves with freeze-thaw cycles, often popping out of the ground within a few years. Metal edging lasts longer and holds curves well but can rust over time and creates sharp edges that pose a safety hazard. Stone and brick create the most formal appearance but require hand-trimming after every mow because mower wheels cannot ride along the edge. For properties considering a mix of edging styles, edging types vary by application, and many homeowners use trench edging for beds and mow-over edging along hardscape borders.
Should You Edge Before or After Mulching?
You should edge before mulching. Cutting the trench first establishes the boundary that defines where mulch starts and lawn stops. Mulch applied after the trench is cut flows naturally into the angled slope of the V-groove, creating a finished look where the mulch surface sits slightly below the lawn edge. Mulching before edging buries the line you need to see and forces you to work around loose material that gets in the way of clean cuts.
Apply 2 to 3 inches of mulch across the garden bed after the trench is complete. Allow a thin layer of mulch to settle into the bottom of the V-groove, but do not pile mulch level with or above the lawn surface. Mulch that sits higher than the grass spills onto the lawn with rain and foot traffic, defeating the purpose of the trench. Gardening Know How recommends keeping mulch depth at 2 to 3 inches right up to the trench edge without letting it spill over, which reinforces the visual line and slows moisture loss from the bed. Homeowners looking for fresh mulch ideas can explore different materials and colors that complement the clean trench line.
How Do You Maintain a Landscape Edging Trench?
You maintain a landscape edging trench by re-cutting the vertical edge 1 to 2 times during the growing season, pulling any grass that creeps into the bed, and refreshing mulch as needed. Kansas State Extension recommends re-cutting the edge once or twice per growing season before the grass invasion becomes visible. The spring pass is the most important because it restores the trench profile after winter settling, freeze-thaw movement, and rain erosion.
Maintenance passes take a fraction of the time that the original trench required. A well-established trench needs only a quick vertical re-cut along the lawn side to restore the shadow line. The angled bed side typically holds its shape through the season if mulch stays in place. Pull any bermuda grass runners or stolons that reach across the trench before they root into the bed soil. Waiting until grass establishes in the bed turns a 5-minute pull into a 30-minute digging project.
Heavy rain can wash mulch into the trench and partially fill the V-groove. After a major storm, check the trench line and rake any displaced mulch back into the bed. Re-cut any sections where soil has slumped into the channel. Properties with flower bed edging around multiple beds benefit from scheduling a single maintenance pass across all beds at the same time, which takes less total effort than touching up one bed at a time throughout the season.
Does Landscape Edging Increase Home Value?
Yes, landscape edging increases home value as part of the broader curb appeal that buyers evaluate before stepping inside a house. A Virginia Tech study by horticulturist Dr. Alex Niemiera found that well-landscaped homes carry a 5.5 to 12.7% price advantage over homes with no landscaping, which translates to $16,500 to $38,100 in additional value on a $300,000 home. The National Association of Realtors reports that 97% of real estate agents believe curb appeal is important for attracting buyers, and 74% recommend sellers complete a landscape maintenance program before listing.
Clean bed lines created by trench edging are one of the most visible maintenance signals a property can display. A HomeLight survey found that 94% of top real estate agents say great curb appeal equals money at closing. The Journal of Environmental Horticulture reports that poor landscaping can reduce property values by 10%, making the contrast between a well-edged yard and a neglected one worth tens of thousands of dollars. Trench edging costs nothing in materials and takes only a few hours of labor for a typical front yard, making it one of the highest-return landscaping tasks a homeowner can perform.
Frequently Asked Questions
How Long Does It Take to Dig an Edging Trench by Hand?
Digging an edging trench by hand takes approximately 15 to 30 minutes per 10 linear feet for a new trench in average soil conditions. A typical front yard garden bed with 30 to 50 linear feet of edge takes 1 to 2 hours to complete. Clay-heavy soil takes longer because each cut requires more force. Sandy soil cuts faster but crumbles more, requiring extra cleanup. Maintenance re-cuts on an established trench take roughly half the time of the original dig because the V-profile already exists and only needs refreshing.
Does Trench Edging Help With Drainage?
Yes, trench edging helps with drainage by creating a shallow channel that directs surface water away from the garden bed and into the lawn where it can absorb into the soil. The V-shaped profile acts as a miniature drainage channel that prevents rainwater from pooling against the bed edge and washing mulch onto the lawn. Properties with persistent bed washout or mulch displacement often see improvement after re-cutting a deeper, more defined trench along the problem areas.
How Do You Edge Around Trees?
To edge around trees, use a narrow trenching shovel or hand trowel to follow a smooth circle around the trunk. Stay at least 12 to 18 inches away from the trunk to avoid cutting into surface roots. Dig the trench to the same 3-to-4-inch depth as the rest of the bed. Tree root flares may prevent a full-depth cut in some spots, so work around major roots rather than cutting through them. Damaged surface roots can stress the tree and create entry points for disease.
Can You Use a Power Edger for Trench Edging?
You can use a power edger to maintain an existing trench, but power edgers do not create the full V-profile needed for a new Victorian trench edge. Power edgers cut 1 to 2 inches deep in a narrow line, which is too shallow and too narrow for a proper landscape edging trench. Use a hand spade or half-moon edger to establish the trench at the correct depth and angle, then switch to a power edger for quick seasonal touch-ups between full re-cuts.
What Is the Best Edging Method for Flower Beds?
The best edging method for flower beds depends on the landscape style and budget. Trench edging is the best all-purpose choice because it costs nothing, adapts to any bed shape, and allows mower wheels to ride along the edge for clean trimming. Metal strip edging works best for modern designs that need precise, permanent lines. Stone or brick edging fits formal landscapes but requires more investment and ongoing hand-trimming. For most residential properties, a Victorian trench produces results equal to purchased edging products at zero material cost.
Putting It All Together
A landscape edging trench is one of the simplest and most effective improvements you can make to any garden bed. The Victorian trench method requires only a flat spade, a garden hose for layout, and a couple of hours of work. The V-shaped profile keeps grass out of beds, holds mulch in place, and creates the kind of clean shadow line that makes an entire yard look intentional. Maintaining the edge with one or two re-cuts per season keeps the line sharp year after year without any ongoing material cost.
Whether you are refreshing an existing bed or starting a new planting area from scratch, clean edging sets the foundation for everything that follows. We work with homeowners across North Alabama to create outdoor spaces that look polished and function well through every season. Reach out to us at White Shovel Landscapes or call 256-612-4439 for a free estimate on professional installation and garden bed design.



You May Also Like

Sep 12, 2026
3 min
How to Keep Landscape Edging Straight
Sep 11, 2026
3 min
How to Decorate a Patio: Ideas for 2025 and 2026
Sep 9, 2026
3 min
How to Trim Around Landscape Edging
Sep 7, 2026
3 min
What Does a Lawn Look Like After Aeration
Have a Project in Mind?
If this post sounds like your yard, tell us about it. Request an estimate online or give us a call, and we’ll talk through what your property needs.





Transforming Huntsville & Madison yards since 2011 with expert landscape design, garden makeovers, mulching, and top-quality installations.


